How to Mass Add Employees in tmsConneXion v4
Summary
This document addresses work instructions for how to upload multiple employees to tmsConneXion.
1. Open the Excel spreadsheet that your TMS Project Specialist supplied you at the beginning of your project.
2. It is important that you do not remove any columns or manually enter information in cells with a drop down arrow/menu (only choose the options available). Doing so will prevent your employee’s information from properly uploading into tmsConneXion.
Employee Entry
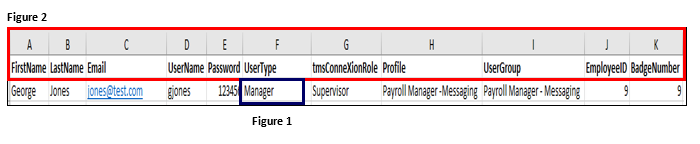
1. Entering a user with the UserType of Employee (Figure 1). An Employee can be defined as someone who will not need access to MyTeam and typically does not have direct reports. Let’s look at cells A-K (Figure 2).
A. Fill in the FirstName as you want it to appear in tmsConneXion.
B.Fill in the LastName as you want it to appear in tmsConneXion.
C. Email address for Employee is optional, however, using this allows the user to reset their own password and receive tmsConneXion messages.
D. Enter a unique UserName (this can be alpha, numeric or a combination of both).
E. Enter a minimum 6-digit and/or character (including special character) password. The user will be prompted to change this upon first login.
F. Under UserType, click the cell to see the dropdown menu and its options. Select Employee.
G. Under tmsConneXionRole click the cell to see the dropdown menu and its options. Select Employee, which will give the user rights to see only their own information in tmsConneXion.
H. Profile is not used for those with the UserType of Employee.
I. User Group is not used for those with the UserType of Employee.
J. Enter the user’s Employee ID. As a rule, the Employee ID should match up to your payroll system.
K. Enter the user’s Badge Number to round out your employee’s basic information

2. Cells L-U are looking for optional personal information that you may or may not want to enter. Date of Hire, Address 1 and 2, City, State, Zip, Phone, Emergency Contact, and DOB are not necessary (Figure 3). If you chose not to enter this information now, you can always edit your employee’s information later. If you do choose to enter this data, each of these cells are freeform so you will manually enter the information (no dropdown menus).

3. Start filling in the remainder of the employment information in cells V-AI (Figure 4).
V. Select your employee’s appropriate PayClass from the dropdown menu.
Q. In cells W thru AC, select your Work Group options from the drop-down menus. These are the work group levels that you requested to be setup. Please note, that not all of these columns will be used, so you will leave the unused levels blank. Please do NOT delete unused columns.
AD Enter the Pay Type from the drop-down menu.
AE Point your employees to the proper Clock Group via the drop-down menu. This is necessary even if your company will not be using clocks.
AF Rate of Pay is optional. If used, the format will be xx.xx and will be manually entered.
AG Avg. Daily Hrs. is optional.
AH Select the user’s Hourly Status from the dropdown menu.
AI If using ESS Mobile, enter the ESSMobilePin, otherwise, leave it blank.

Manager/Employee Entry
1. Entering a user with the UserType of ManagerEmployee (Figure 1). A Manager/Employee will need access to both MySelf and MyTeam. Let’s look at cells A-K (Figure 2).
A. Fill in the FirstName as you want it to appear in tmsConneXion.
B.Fill in the LastName as you want it to appear in tmsConneXion.
C. Email address for Manager/Employee is required, type this in.
D. Enter a unique UserName (this can be alpha, numeric or a combination of both).
E. Enter a minimum 6-digit and/or character (including special character) password. The user will be prompted to change this upon first login.
F. Under UserType, click the cell to see the dropdown menu and its options. Select Manager/Employee.
G. Under tmsConneXionRole click the cell to see the dropdown menu and its options. Select Supervisor, which will give the user rights to see their own information as well as any direct reports information in tmsConneXion.
H. Select the menu under Profile and select the proper option.
I. Select the menu under User Group and select the proper option.
J. Enter the user’s Employee ID. As a rule, the Employee ID should match up to your payroll system.
K. Enter the user’s Badge Number to round out your manager/employee’s basic information.

2. Cells L-U are looking are looking for optional personal information that you may or may not want to enter. Date of Hire, Address 1 and 2, City, State, Zip, Phone, Emergency Contact, and DOB are not necessary (Figure 3). If you chose not to enter this information now, you can always edit your employee’s information later. If you do choose to enter this data, each of these cells are freeform so you will manually enter the information (no dropdown menus).

3. Start filling in the remainder of the employment information in cells V-AI (Figure 4).
V. Select your employee’s appropriate PayClass from the dropdown menu.
W. In cells W thru AC, select your Work Group options from the drop-down menus. These are the work group levels that you requested to be setup. Please note, that not all of these columns will be used, so you will leave the unused levels blank. Please do NOT delete unused columns.
AD Enter the Pay Type from the drop-down menu.
AE Point your employees to the proper Clock Group via the drop-down menu. This is necessary even if your company will not be using clocks.
AF Rate of Pay is optional. If used, the format will be xx.xx and will be manually entered.
AG Avg. Daily Hrs. is optional.
AH Select the user’s Hourly Status from the dropdown menu.
AI If using ESS Mobile, enter the ESSMobilePin, otherwise, leave it blank.

Manager Entry
1. Entering a user with the UserType of Manager (Figure 1). A Manager will need access to MyTeam. Fill in cells A-K (Figure 2).
A. Fill in the FirstName as you want it to appear in tmsConneXion.
B. Fill in the LastName as you want it to appear in tmsConneXion.
C. Email address for Manager is required, type this in.
D. Enter a unique UserName (this can be alpha, numeric or a combination of both).
E. Enter a minimum 6-digit and/or character (including special character) password. The user will be prompted to change this upon first login.
F. Under UserType, click the cell to see the dropdown menu and its options. Select Manager.
G. Under tmsConneXionRole click the cell to see the dropdown menu and its options. Select Supervisor, which will give the user rights to see their own information as well as any direct reports information in tmsConneXion. Payroll Manager can be selected if the user will have edit rights to tmsConneXion.
H. Select the menu under Profile and select the proper option.
I. Select the menu under User Group and select the proper option.
J. Enter the users Employee ID. As a general rule, the Employee ID should match up to your payroll system.
K. Enter the users Badge Number to round out your employee’s basic information; manually keying in the information for each.
Loading the Information
1. Once you have completed your data entry, save the file to convenient place (i.e. your desktop).
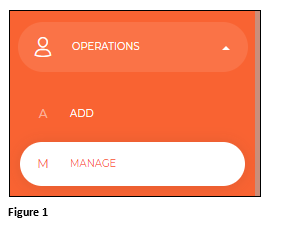
2. Sign in to tmsConneXion and select Operations and Manage from the menu (Figure 1). Please note that only those with a Role of Payroll Manager tmsConneXion will have access to add employees.
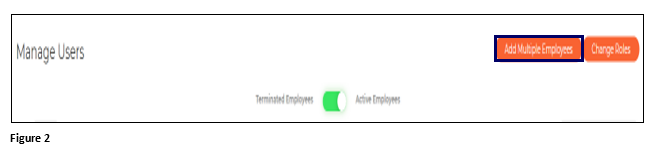
3. From Manage Users, select Add Multiple Employees (Figure 2).
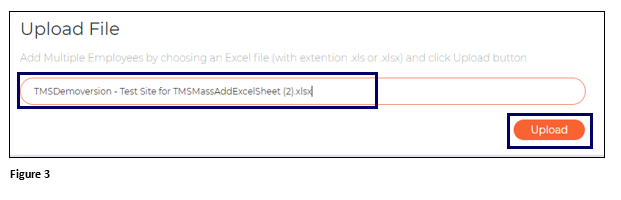
4. Click on the upload box and find the location of your file. Click Upload (Figure 3).
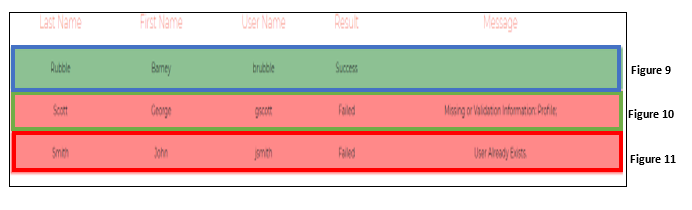
5. A validation box will appear once your spreadsheet has loaded. You will be notified if specific employees were added successfully (Figure 9) or if there was a failure and what the reason was (Figure 10). You will also notice that you will get a failure if the employee has already been loaded successfully previously (Figure 11). For employees that failed, make the appropriate changes to the spreadsheet, re-save and re-upload. Please note that once an employee has been uploaded, any changes you will make to their information must come from Manage User. Changes made to the spreadsheet will not override an existing employee.