Onboarding New Employees Using tmsPay
Summary
This document addresses work instructions for how to onboard new employees with tmsPay.
Onboarding Overview
Onboarding is the process of hiring a new employee and entering them into the software system for payroll. Setting up Onboarding is a simple, yet effective way to make sure that new hires receive all their paperwork and receive a friendly, easy flow process into the payroll system.
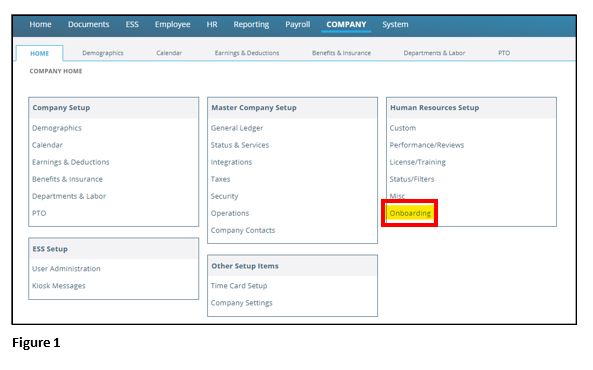
Once Onboarding has been added as a service for your company, click on the Company tab. Under the Human Resources Setup box, there will be a hyperlinked Onboarding selection (Figure 1). Clicking on Onboarding will take you to the Onboarding subtab where you will be setting up additional specifications for your company’s onboarding.
When setting up Onboarding, it’s helpful to have the following information ready:
1. If the Group will be setup by State or Cost Center(s).
2. If managers will be able to request the new hires for onboarding.
3. If Direct Deposit will be available and/or required.
4. All required forms that are needed during the hiring process.
a. Do any of the forms apply to a specific Group?
5. Welcome screen verbiage.
Group Setup
- Groups must be created before using Onboarding.
- Creating Groups helps to distinguish where new hires will be placed within the company.
- Groups should be created for every state your company is in and/or by the Cost Center(s) your company has set up.
- Groups can also be created based on the specific forms that are requested during the hiring process (IE: Form I-9, Form W-9).
- Your company is not limited to the number of Groups that can be created, and it can be as simple as creating just one Group.
To create a Group, click on the Company tab and the hyperlinked Onboarding selection under the Human Resources Setup box (See Figure 1). From Onboarding , click on the Setup tab and then click on Add (Figure 2).
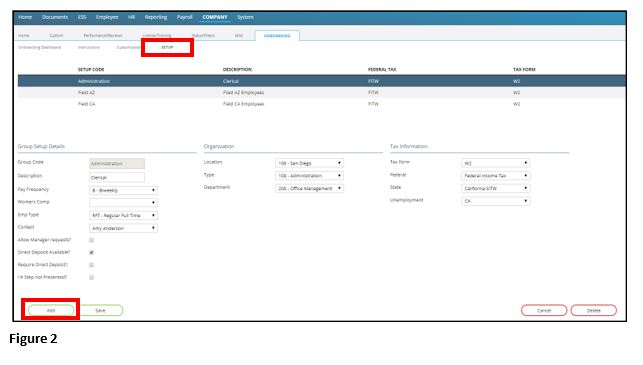
Under the Group Setup Details section, make the following selections (Figure 3)
Group Code: Enter the name for the Group (IE: Field, Administration, 1099).
Description Enter a further description of the Group name.
Pay Frequency: How often will this Group be paid (IE: Weekly, Biweekly, Monthly).
Workers Comp: Select the applicable workers compensation code.
Emp Type: Select the new hire’s Group type next to (IE: Regular Full Time, Temporary Part Time).
Contact: Select your company’s point of contact. This person will be the responsible contact for this group of new hires. Onboarding can be made available to Managers on the Kiosk, allowing them to submit basic new hire data to be approved prior to new hire tasks being generated.
Allow Manager requests?: Select this if it is determined that Managers can request new hires to be onboarded for this particular Group.
Direct Deposit Available?: If direct deposit selection is going to be available to the new hire during the onboarding process, this will allow new hires to enter this information at this time.
Require Direct Deposit?: Depending on some state’s laws, direct deposit can be a requirement. Check if this is the case.
I-9 Step not Presented?: If you want a new hire to skip the I-9 Form compliance task during onboarding, you can select this box This can be used, for example, if this Group is for 1099 individuals, or if you are collecting I-9 Form information from a different system.
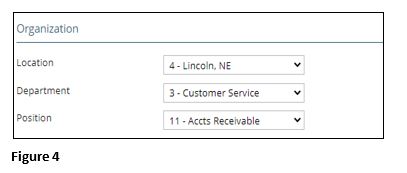
Under the Organization section, you may narrow your Group based on the Cost Center(s) you have set up for your company. These selections can be overridden on an employee-by-employee basis once the new hire is in the system, so these selections are not required to be made on this Group setup screen. Depending on how many Cost Codes have been set up for your company, you may have from one to five drop down boxes to select from. Choose those which pertain to the particular new hire Group you are setting up (Figure 4).
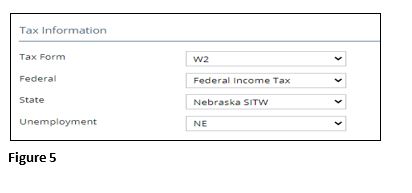
Under the Tax Information section, make the following selections (Figure 5).
Tax Form: Select the tax form this Group will be using (IE: W2, 1099).
Federal: Select the correct Federal tax which applies to this Group.
State: If the Group is a W2, select the correct state which applies to this Group.
Unemployment: Select the correct state which applies to this Group.
If there are any local taxes, select as appropriate from any dropdown boxes. Once all areas are selected for this Group, click on Save.
Instruction Setup
There are multiple tasks that new hires will go through when completing the Onboarding process. For each of these tasks, you are able to set up customized instructions to help guide them through the process. As a default there’s already an instruction information button on each task page, which gives new hires contact information for their Onboarding Group contact, should they have any questions during the Onboarding process (this point of contact was designated when setting up Groups, directions above).
To Create Instructions
Click on the Company tab and then click on the hyperlinked Onboarding selection under the Human Resources Setup box (as shown in Figures 1 and 2 above). Within this Onboarding screen, click on the Instructions subtab. At the bottom of the screen, click on Add (Figure 1).
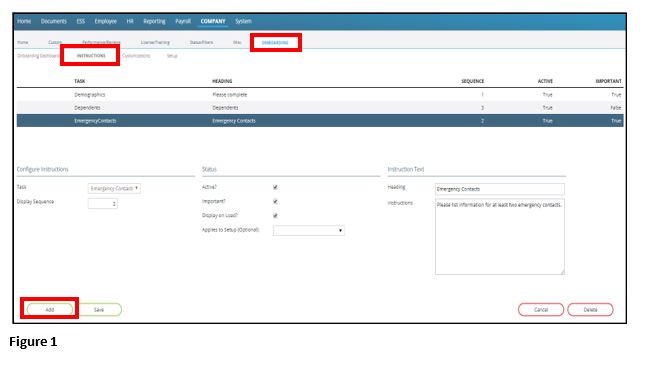
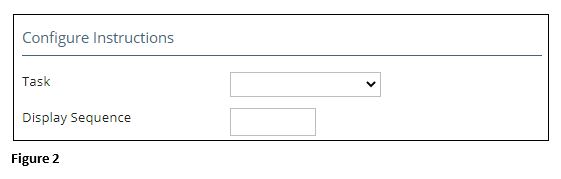
Under the Configure Instructions section, you will select the particular task that pertains to the Instruction you are customizing (Figure 2).
Task: Select the Task dropdown button and select the most relevant task that you’ll be making customized instructions for. The options include:
- Additional Information
- Basic Information
- Dependents
- Direct Deposit
- Emergency Contacts
- Compliance
- Review and Submit
- Taxes
- Welcome.
Display Sequence: Select the Display Sequence number, which will specify the sequence the Instructions are shown during the Onboarding process for the new hire.
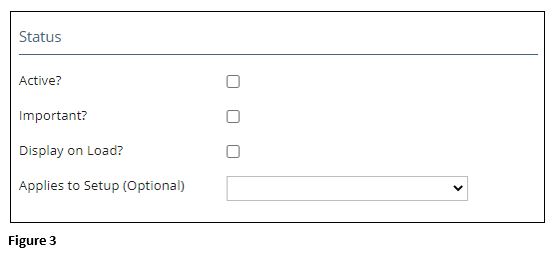
Under the Status section, make the following selections (Figure 3)
Active?: If the Active? box is checked, it will be an Instruction which will appear for the new hire during the Onboarding process.
Important?: If this box is selected, an alert/warning symbol will be generated and will reflect next to the Instruction heading for this area.
Display on Load?: Instructions will require the new hire to click on a magnifying glass icon to see the full Instructions on the loaded page. To set up Instructions to show when automatically when loaded, select this box
Applies to Setup (Optional): To filter Instructions to a single Onboarding Group, use the dropdown box next to Select the Group that these Instructions are being created for. You can only attach one Group per Instruction, so if you need to do a custom entry for 3 different Groups, you’ll have to add the Instructions in 3 times, for each Group.
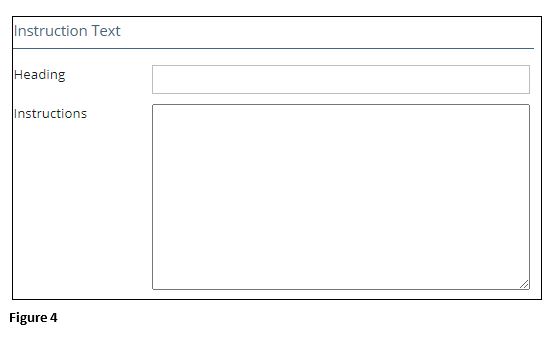
Under the Instruction Text section, you will enter a Heading for this particular Instruction. In the Instructions box, add any additional details to assist with completing this particular Instruction (Figure 4).
Company Contacts
Generally, a company will need to designate who will be a point of contact for new hires to reach out if they have questions during the onboarding process.
Company Contacts Setup
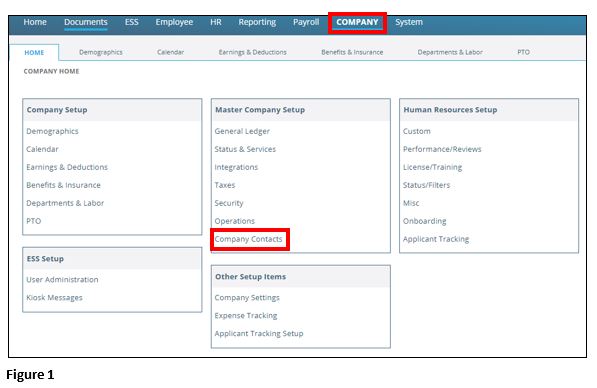
1. Click on the Company tab and then click on the hyperlinked Company Contacts selection under the Master Company Setup box (Figure 1).
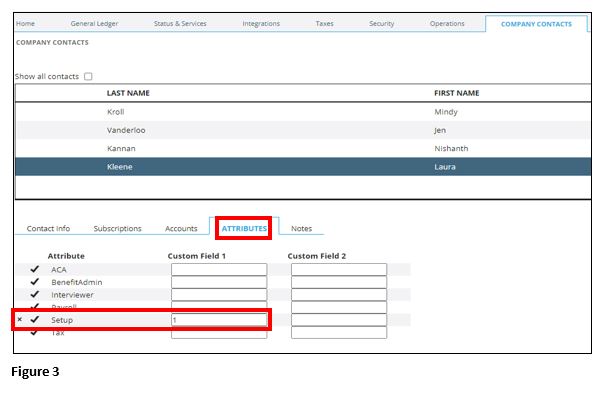
2. Highlight the contact(s) you will be designating as a setup point of contact(s) and select the Attributes tab (Figure 2).
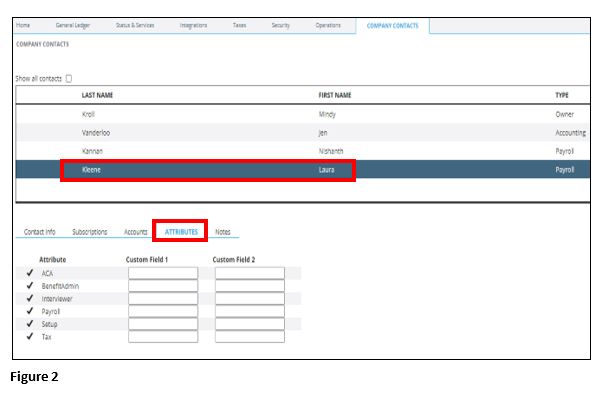
3. From Attributes, find the Setup line; click on the check mark ( ) which will designate this contact as a setup point of contact and their information will be listed on the new hire’s ESS (Employee Self Service) kiosk.
4. Enter a one (1) in the Custom Field 1 box, next to Setup.
5. Once completed, click on the check mark again (Figure 3).
6. To remove this contact from being a setup point of contact, click on the ‘X’ to the left of the check mark. Make sure this contact is marked as Active within the Contact Info section, or they will not be able to be a designated setup point of contact.
Onboarding Dashboard
The Onboarding Dashboard will show every new hire and/or employee who has been created through onboarding. It is the central command for all the onboarding steps, start onboarding a new hire; see the status and what steps a new hire has completed during the onboarding process; and complete a new hire’s onboarding process, ultimately adding them to the company’s payroll.
To Access the Onboarding Dashboard
1. Click on the Company tab
2. Click on Onboarding selection under the Human Resources Setup box.
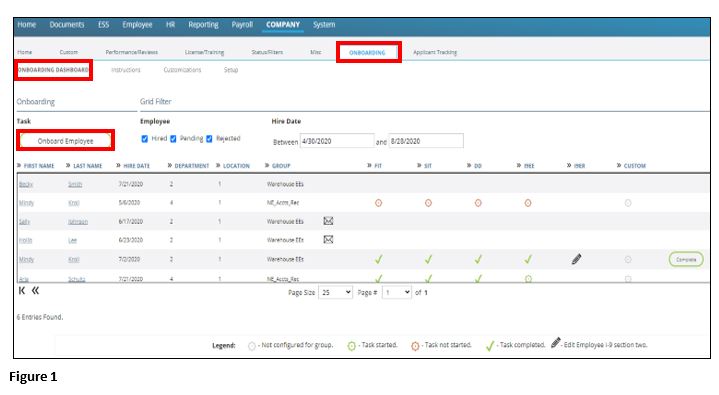
3. From the Onboarding screen, click on the Onboarding Dashboard subtab (the Onboarding Dashboard can also be reached by clicking on Dashboards on the Home page, then clicking on the Onboarding Dashboards subtab.)
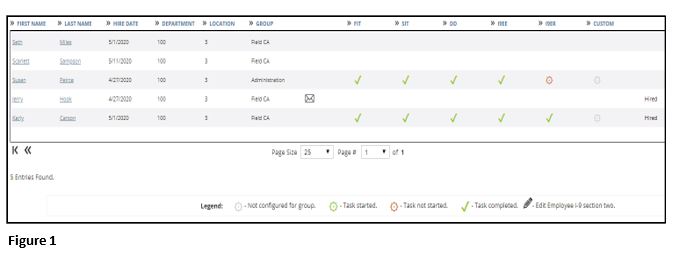
4. Click Onboard Employee to start the onboarding process (Figure 1).
The task of onboarding new hires can also be accessed and completed in two other ways.
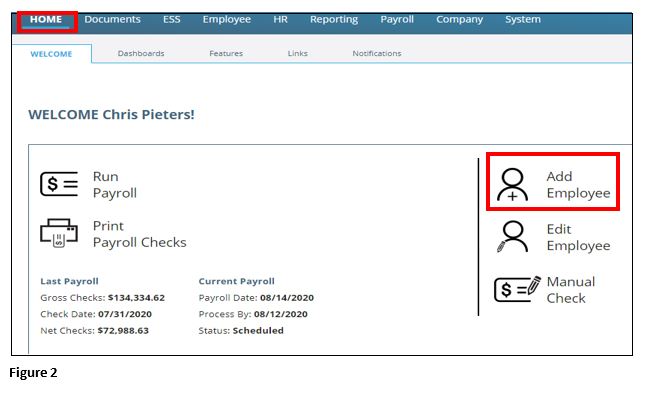
1. From the Home page, click on Add Employee and select Onboarding (Figure 2). You will be directed to the Onboarding page.
2. Another way is: as a Manager within ESS (Employee Self Service), click on the Onboarding tab. The Request New Employee page will pop up, where the Group the new hire will be associated with will need to be selected. At the least, all of the new hire’s Basic Information needs to be completed. When finished, click on Save and Notify Contact which will send an email to the Onboarding Group point of contact, letting them know there is a new hire who needs to be proces
3. Once a new hire has been added via ESS, they will reflect on the Onboarding Dashboard, however two more steps will need to be taken in order to have the new hire receive an email letting them know they can access the kiosk and complete the onboarding process.
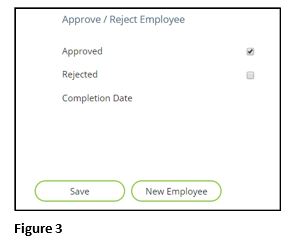
a. Return to the Dashboard and click on the new hire’s name, which should be listed at the top of the list on the Dashboard. When their information pops up, scroll down to the bottom of the page. If they’re going to be hired and you’d like them to receive the kiosk email, put a check mark next to Approved and then click on Save (Figure 3).
b. Once completed, return to the Dashboard by clicking on the Onboarding Dashboard subtab in the upper left corner of the screen. Then locate the new hire’s name, which should now be listed alphabetically by last name. To the right of the new hire’s last name, there will be an envelope icon. Click on this icon and an email will be automatically sent to the new hire so they can access the kiosk and complete their onboarding process.
Grid Filter Section
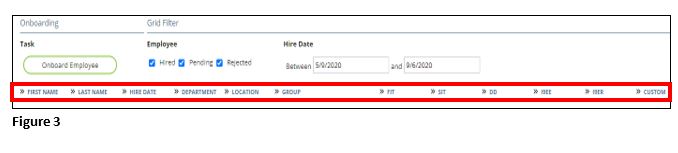
Under the Grid Filter section, there are filtering options that can be changed to reflect what is shown on the Dashboard (Figure 1).
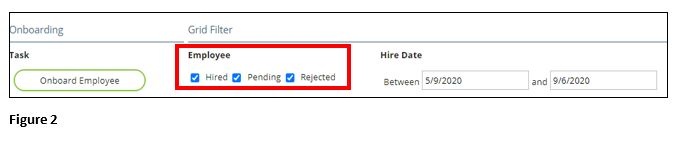
As a default, all three Employee boxes are always checked, but you can unselect any of them to Hired, Pending and/or Rejected new hires. The Hire Dates default to the current year but can be changed as needed (Figure 2).
The Dashboard has set columns and by clicking on the arrows you can filter the new hires by each of the columns. Filters may be used by First Name, Last Name, Hire Date, Cost Codes (IE: Department, Location), Group, Federal Income Tax (FIT), State Income Tax (SIT), Direct Deposit (DD), I-9 Form completion by the new hire (I9EE), I-9 Form completion by the employer (I9ER), Custom (any custom requirements requested by the company for the new hire to complete during onboarding).
Each column on the Dashboard reflects an icon that shows where in the onboarding process the new hire is at. A legend for these icons is at the bottom of the screen (Figure 4).

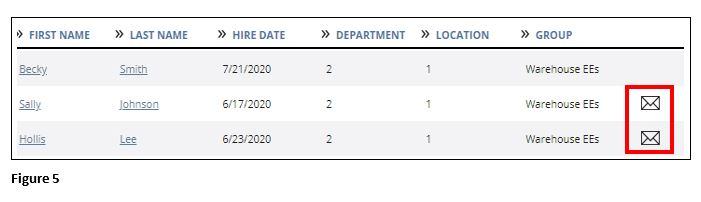
If a new hire has been sent the automatically generated onboarding email so they can access the ESS kiosk and complete their onboarding package, an envelope will reflect next to the Group column on that new hire’s row in the Dashboard. If the new hire needs another email sent to them for any reason, clicking this envelope will send them another email so they can access the ESS kiosk and complete the onboarding process (Figure 5).
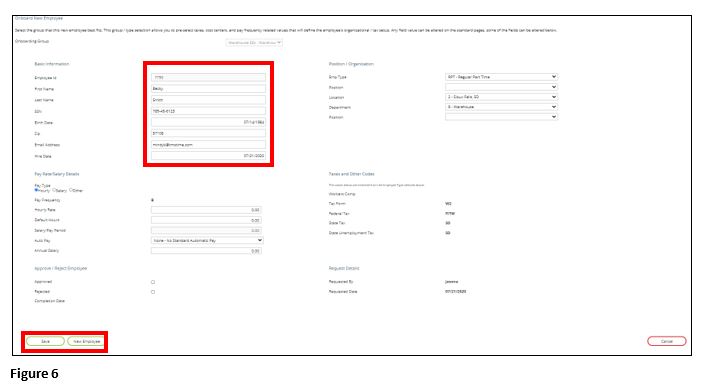
If any changes need to be made to the new hire’s information, clicking on the new hire’s name allows you to do so. When this screen opens up you can edit some of the new hire’s Basic Information (name, SSN, birthday, contact information, hire date), Position/Organization (type of employee and Cost Centers), Pay Rate/Salary Details (pay type, pay frequency), and Approve/Reject Employee (clicking on the box next to Rejected will reject this new hire). If any changes were made, click on Save. To return to the Dashboard, click on the Onboarding Dashboard subtab in the upper left corner of the screen (Figure 6).
Once all tasks have been completed by the new hire, the final option given is to Complete the new hire so they become an employee in the company’s system. This Complete icon will only be visible on the Dashboard once the new hire has completed all of their onboarding tasks and submitted all of their information. (Please note that the I-9 Form completion task needed by the employer (I9ER) does not need to be completed by the employer in order to Complete the new hire’s onboarding process; it can be completed at a later time.)
When you are ready to complete the onboarding process for the new hire, click on Complete (Figure 7).

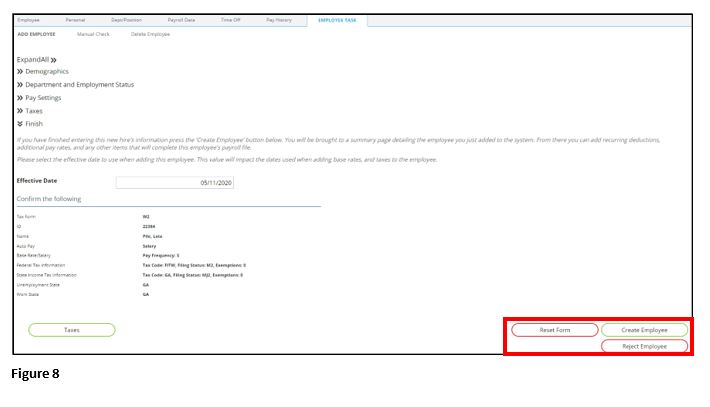
The New Hire Wizard will open. Here the new hire’s information may be reviewed and any necessary changes made within the different sections.
The new hire’s Employee ID will already be reflected as what was already defaulted or listed in prior steps. Should the ID need to be changed for any reason, this is the only place to override the ID before the new hire becomes an employee. If a new hire is not eligible to be hired or if they never start working, they can be rejected on this screen by clicking on Reject Employee in the bottom right of the screen. Once everything has been reviewed, click on Create Employee (Figure 8). If the new hire has been added to the company’s system as an employee and on the Onboarding Dashboard, their status will reflect as Hired.
I-9 Form Employer Finalization
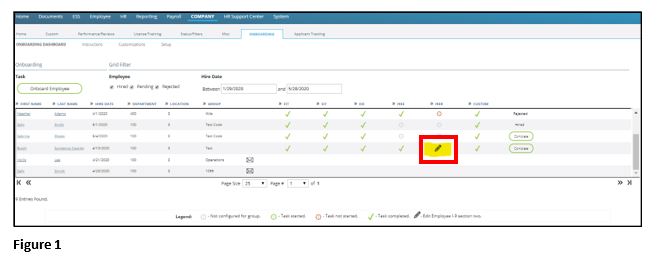
Once the new hire accesses the ESS kiosk and completes all their required tasks, you will receive an email notification. Although the I-9 employer task is not required in order to complete the new hire’s onboarding process within the system, you can complete this task while in the Onboarding Dashboard. Click on the pencil icon below the I9ER column on the row with the new hire’s name (Figure 1).
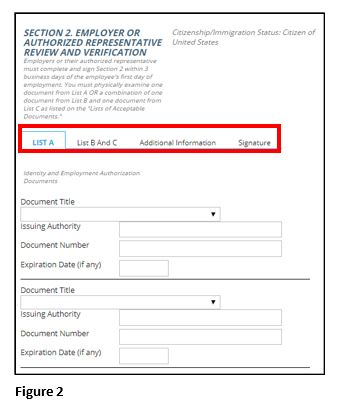
You will review the I-9 Form, document the identification information that the new hire provided (in either the List A tab or the List B and C tab), electronically sign the form (in the Signature tab) and click Save (Figure 2).
Onboarding Document Storage
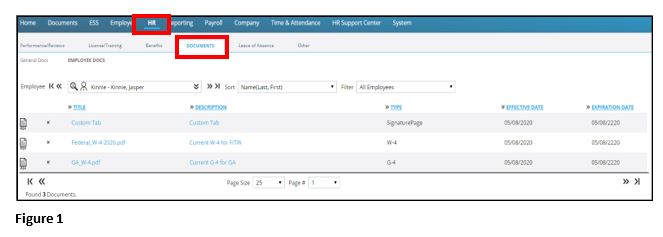
W-4s and many other documents the new hire filled out when doing the Onboarding process, can be located by clicking on the HR tab on the Home page, clicking on the Documents subtab and then clicking on the Employee Docs subtab (Figure 1).
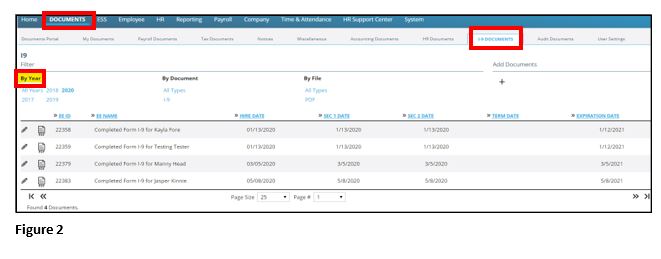
Completed I-9 Forms can be found in the Documents portal. Click on the Documents tab on the Home page and then click on the I-9 Documents subtab. By default, all I-9 Forms will reflect when the page populates, no matter when they were filled out or what type of document the form is. The forms can be filtered by the year the I-9 was completed. This can be done by clicking on any of the years reflected below By Year (highlighted in yellow, below) (Figure 2).
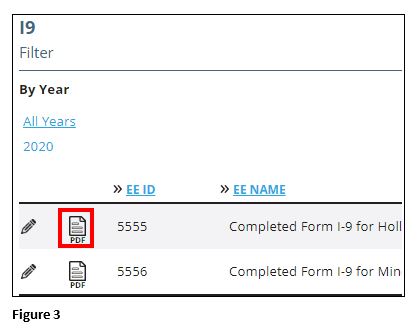
Each result reflects the Employee’s ID number, the Employee’s Name, their Hire Date, the Section 1 Date, the Section 2 Date (the dates the first section and second section of the I-9 Form were completed), the Employee’s Termination Date and the I-9 Form’s Expiration Date. In order to view an I-9 Form, click on the PDF view icon to the left of the Employee’s ID number. If any I-9 document information needs to be adjusted, click on the edit icon (pencil) to the left of the PDF view icon, and adjustments can be made within the popup window. (Figure 3).
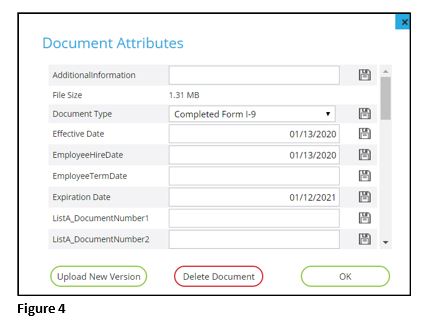
If anything is adjusted on a line within this window, the save icon on the far right section of each line needs to be clicked on. Once completed, click on OK (Figure 4).
New Hire Tasks for Onboarding
New Hire Overview
This is where new hires will register on the ESS kiosk and will begin filling out their information in the system. Any changes that need to be made to their information, along with any necessary documents to fill out, will be made during this process.
New Hire Tasks-Walkthrough
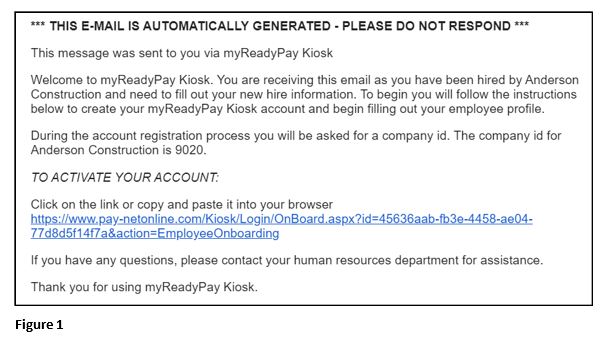
1.The first thing that the new hire will receive is an email letting them know they have been selected to become a new hire with your company, and that they need to fill out their new hire information on the ESS kiosk (Figure 1).
2. Once the new hire receives the email, they will click on the link to open the ESS kiosk. They will need to register by making a password in order to access their account (Figure 2). This will allow them to log into the system.

3. Once new hires have logged on, they will be taken to the Welcome screen where they will begin the onboarding tasks. They will need to go through each of the tasks, which are reflected on the left side of the screen. Detailed instructions for some of the tasks can be viewed by clicking on the magnifying glass icon next to Instructions on the top of the screen. Once each task has been completed, click on Save & Continue. Any task can be saved and revisited anytime, by clicking on Save within that task and then clicking on any other task on the left side of the screen (Figure 3).
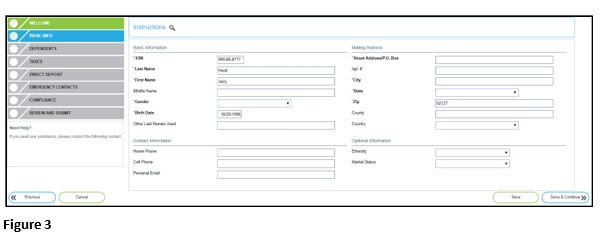
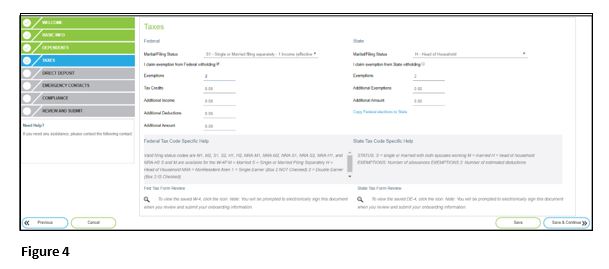
4. Within the Basic Info task, the sections which must be completed have a red asterisk (*) next to the box’s title. If applicable, they will fill out any dependents within the Dependents task (if no dependents, click on Save & Continue). Listing dependents is done by clicking on the hyperlinked Add Dependent in the top right of the screen, completing all of the sections. Within the Taxes task, they will select their Federal tax filing status, and any exemptions, if applicable. If their State tax elections are the same as their Federal, they can click on the blue hyperlinked Copy Federal elections to State, so they do not have to complete the process twice. After clicking Save, they can view their Federal W-4 tax form and their State tax form by clicking on the magnifying glass icons near the bottom of the page (Figure 4).
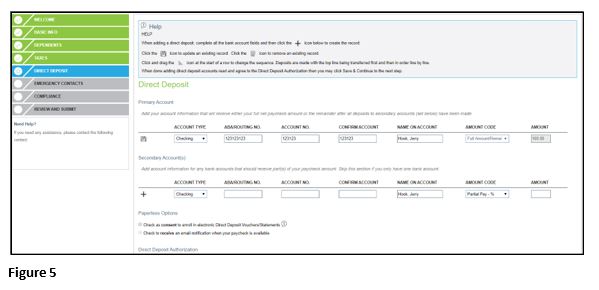
5. The Direct Deposit task can be either optional or required. Once they enter all of their direct deposit information, they need to click the plus (+) sign on the left side of the screen, in order for their data to be added to the system. After all accounts have been added, the Direct Deposit Authorization agreement must be read and agreed to before proceeding to the next task. Within the Emergency Contacts task, they will need to click on the hyperlinked Add Contact in the top right of the screen, completing all of the sections which have a red asterisk (*) next to the box’s title (Figure 5).
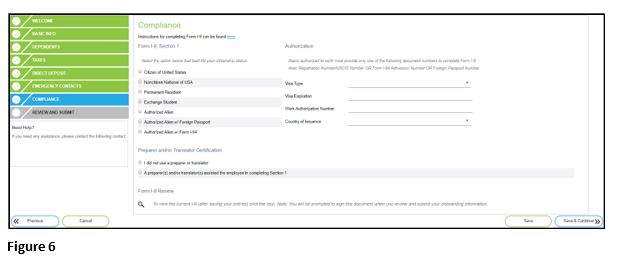
6. The Compliance task is where they will fill out their I-9 Form. They will read the options and select the one which represents their status. After clicking Save, they can view their I-9 Form by clicking on the magnifying glass icon near the bottom of the page (Figure 6).
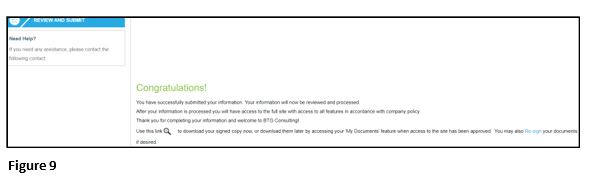
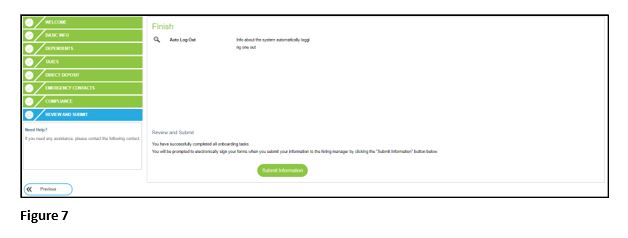
7. The final task, Review and Submit, is the reviewing of any documents, if applicable, and submitting their information for review. If any documents need to be reviewed, they will need to click on the magnifying glass to the left of the document name. If acknowledgment of reviewing a document is needed, they will need to click on the green box to the right side of the document, after reviewing it. Once everything has been reviewed and completed, they will click on Submit Information (Figure 7).
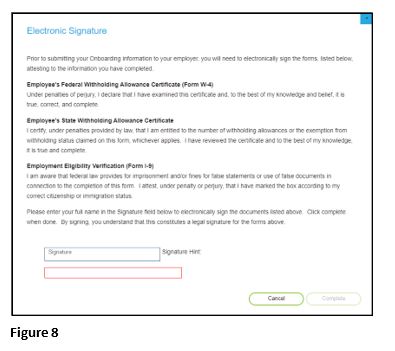
8. The next screen that pops up is an Electronic Signature page, which reflects all of the forms that will be electronically signed by the electronic submission. They will need to type their name into the Signature box, then hit Complete (Figure 8).
9. After this has been done, the new hire’s information will be sent through the system and the status of each task will reflect on the company’s Onboarding Dashboard. If needed, the new hire can access the ESS kiosk anytime to make changes to some of their completed tasks and re-sign their documents, as long as the employer hasn’t already completed their tasks of making a new hire an employee in the system (Figure 9).