Enrolling for Benefits Using the ESS Kiosk in tmsPay
Summary
This document addresses work instructions for how employees can enroll for benefits using the ESS kiosk in tmsPay.
Benefit Enrollment Overview
Benefit Enrollment is the process of employees electronically selecting, enrolling in and submitting their company benefits through a streamlined approach on the ESS kiosk during the open enrollment timeframe.
How to Enroll for Benefits
1. The employee will receive an email from the company, letting them know that the open enrollment process has begun and that you can access the ESS kiosk and begin selecting benefits
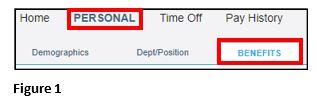
2. Once logged into the kiosk, click on the Personal tab and the Benefits subtab (Figure 1).
The employee be taken to the Open Enrollment screen, where they will need to go through each of the tasks, which are reflected on the left side of the screen. Detailed instructions for some of the tasks can be viewed within the Instructions box on the top of the screen. Once each task has been completed, click on Next, located in the bottom right section of the screen. Any task can be revisited anytime by clicking on Previous, located in the bottom left section of the screen.
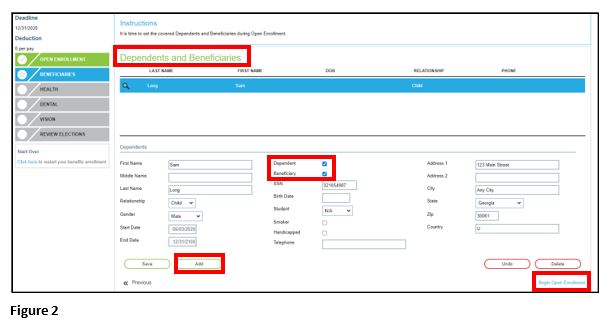
3. The first task, Beneficiaries, is where the user will either add or update dependents and/or beneficiaries, so they can be used when benefits are elected (Figure 2). To begin, click on Add and enter all of the necessary information for this person. Depending on the person’s status, place a check mark next to Dependent and/or Beneficiary and once complete, click on Save. To add more names, repeat the steps above. Once completed, click on Begin Open Enrollment and if there are no more dependents and/or beneficiaries, click on Begin Open Enrollment to move to the next task.
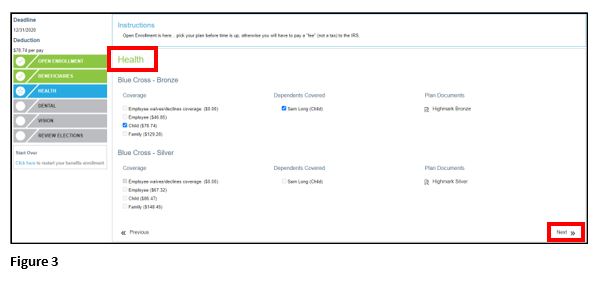
4. Within the Health task, the employee must select which medical/health plan they want to use (Figure 3). Under the Coverage section, one of the following:
- Employee waives/declines coverage--where they will not receive any medical/health benefits through the company.
- Employee--where only the employee is covered by medical/health benefits through the company.
- Child--where the employee and any of their children (which can be selected/unselected under the Dependents Covered section) are covered by medical/health through the company.
- Family--where the employee and their entire family are covered by medical/health benefits through the company.
The premiums deducted each pay period for each of the elections are shown next to each Coverage option. Under the Plan Documents section, the user can open the attachment(s) to review specific details about the plan(s). Once completed, click on Next.
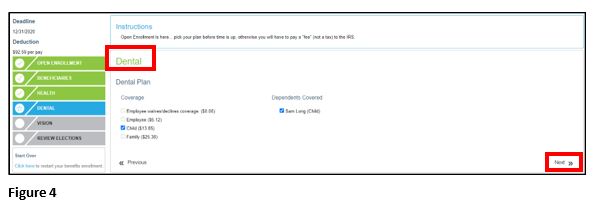
5. Within the Dental task, the user must select which dental plan they want to choose from (Figure 4). Under the Coverage section, select one of the following:
Employee waives/declines coverage where you will not receive any dental benefits with the company.
- Employee--where only the employee is covered by dental benefits through the company.
- Child--where the employee and any of their children (which can be selected/unselected under the Dependents Covered section) are covered by dental benefits through the company.
- Family--where the employee and their entire family are covered by dental benefits through the company..
The premiums deducted each pay period for each of the elections are shown next to each Coverage option. Under the Plan Documents section, the user can open the attachment(s) to review specific details about the plan(s). Once completed, click on Next.
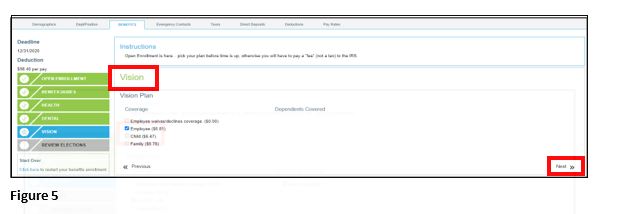
6. Within the Vision task, the user must select which vision plan they want to choose from (Figure 5). Under the Coverage section, select one of the following:
- Employee waives/declines coverage--where the employee will not receive any vision benefits through the company.
- Employee--where only the employee is covered by vision benefits through the company.
- Child—where the employee and any of their children (which can be selected/unselected under the Dependents Covered section) are covered by vision benefits through the company.
- Family-- where the employee and their entire family are covered by vision benefits through the company.
The premiums deducted each pay period for each of the elections are shown next to each Coverage option. Under the Plan Documents section, the user can open the attachment(s) to review specific details about the plan(s). Once completed, click on Next.
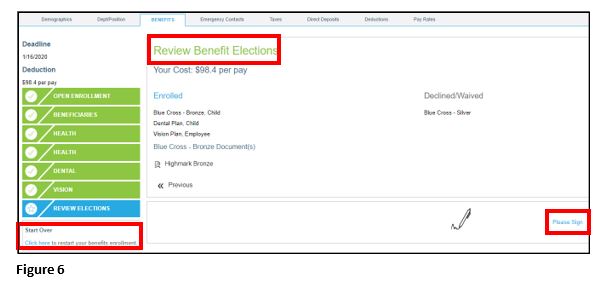
7. The final task, Review Benefit Elections, is reviewing the elected benefits before submitting them (Figure 6). Here the employee will see all of the benefit elections they have made, any benefit elections declined/waived and how much will be deducted each pay period. The employee will also be able to see any plan documents for any of the benefits they have enrolled in.
In case any changes need to be made before submitting their benefits, they can restart the benefit enrollment process by clicking on Click here. If the employee does not complete electing their benefits before logging off of the system, the elections will not be saved and they will have to start the process all over. To submit the benefits, click on Please Sign.
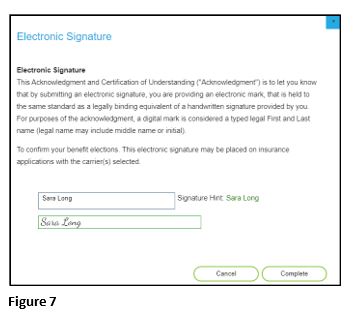
8. The final screen that appears is an Electronic Signature page, which the employee will use to confirm their benefit elections. The employee will need to type their name into the Signature box, then hit Complete (Figured 7).
After this has been done, the employee’s benefit elections will be sent through the system and the status of each task will reflect on the companies Benefit Enrollment Dashboard. If needed and if it’s within the open enrollment timeframe, they may log back onto the kiosk and reselect their benefit options, selecting the option to restart open enrollment.