Benefit Enrollment for Administrators Using tmsPay
Summary
This document addresses work instructions for how to enroll employees for benefits for administrators.
Client Tasks for Benefit Enrolling
Benefit Enrollment Overview
Benefit Enrollment is the process of employees electronically selecting and enrolling in company benefits through a streamlined approach in the software system. Setting up Benefit Enrollment is a simple, yet effective way to make sure that employees are able to go through an easy flow process of electing their benefits.
Setup Benefit Enrollment as a Service
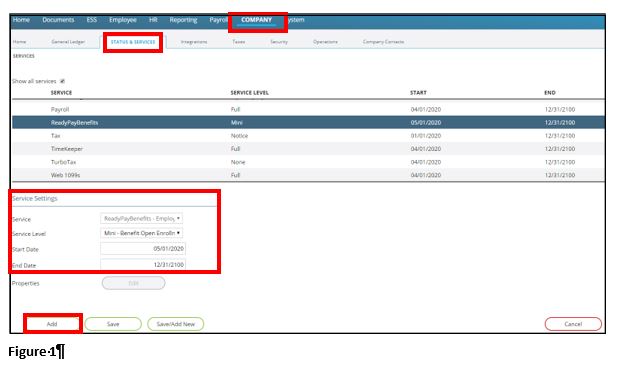
1. Click on the Company tab.
2. Click on the hyperlinked Status & Services selection, under the Master Company Setup box.
3. Under the Service Settings section, click on Add.
4. Next to Service, select ReadyPayBenefits – Employee Benefit Management.
5. Next to Service Level, select Benefit Open Enrollment (it may reflect Mini – Benefit Open Enrollment).
6. Next to Start Date, select the beginning of the current month (IE: if today’s current date is 5/23/2020, select 5/1/2020 as the Start Date). The End Date will default as 12/31/2100. This date doesn’t need to be changed unless a different End Date is required.
7. Click on Save (Figure 1).
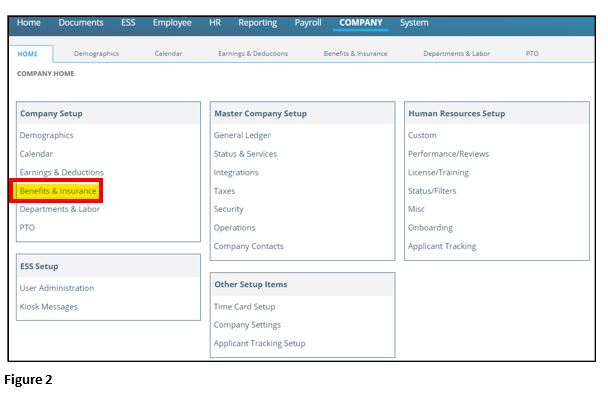
8. Once Benefit Enrollment has been added as a service for your company, click on the Company tab again.
9. Under the Company Setup box, there will be a hyperlinked Benefits & Insurance selection (Figure 2).
10. Clicking on Benefits & Insurance will reveal additional subtabs where you will be setting up additional specifications for your company’s benefit enrollment process.
When setting up Benefit Enrollment, it’s helpful to have the following information ready:
- Applicable benefit plans.
- Benefit plan documents for employees to review during enrollment.
- Open enrollment dates for notifications.
- Instructions for employees to reference during the open enrollment process.
- Instructions for employees regarding their dependents and/or beneficiaries.
Plan Setup
Because employees are going to be electing benefits and benefits include insurance, naturally you’re going to have to make sure all of your different plans are set up. Within this first subtab, you will be adding all applicable plans that an employee will be electing from (called insurance types). Pay close attention to the plan year dates and your premiums since all of this information needs to jive for the employees to see all of the correct information in their open enrollment screens. In order for benefit elections to really work well, you almost have to create plans which are just for a specific year (annual plans listed).
How To Setup Plans
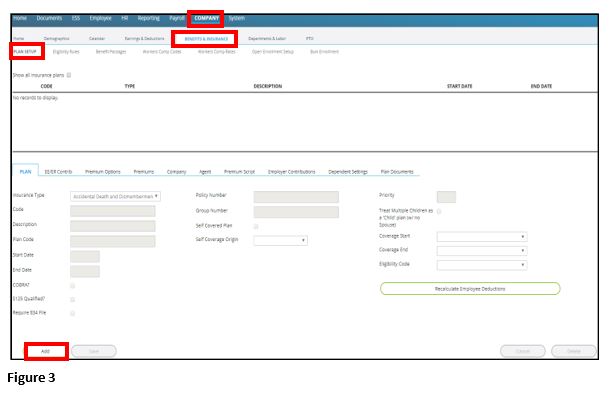
1. Click on the Company tab.
2. Under the Company Setup box, click Benefits & Insurance.
3. Within this Benefits & Insurance screen, click on the Plan Setup subtab.
4. Insurance plans reflected on this screen are driven by the current check date listed in the Payroll tab, so in order to see all of the insurance plans which have been/will be set up, click on the box next to Show all insurance plans.
5. To add a new plan, click Add (Figure 3).
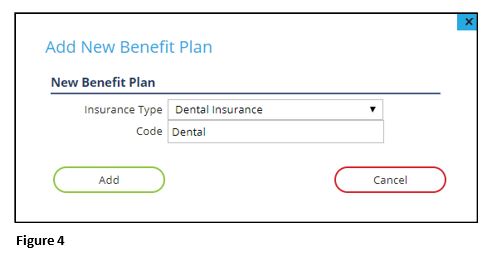
The Add New Benefit Plan window will pop up, which is where you will select the Insurance Type and add a Code (Figure 4).
The following insurance types can be selected:
- Accidental Death and Dismemberment
- Dental Insurance
- Dependent Care,
- Flexible Spending Account
- Health Insurance
- Health Reimbursement Account
- Health Savings Account, Life Insurance
- Long Term Disability
- Medical Insurance,
- Short Term Disability
- Vision Insurance.
Health and Medical are one in the same, where you can choose either one or the other, but you must be consistent using either one or the other throughout selecting plans (IE: you must always use the Health type when listing any health/medical plans; or you must always use the Medical type when listing any health/medical plans). Once completed, click on Add.
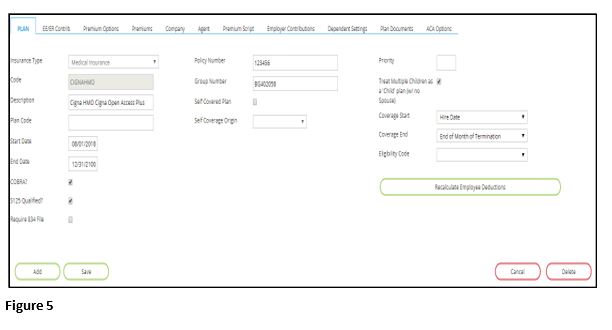
1. From the Plan tab, you will be entering general information about the plan (Figure 5). Enter a Description of the plan (IE: Carrier, Plan Level).
2. Enter the effective dates of the plan in the Start Date and End Date sections.
3. Place a check mark next to S125 Qualified? if the plan is part of the IRS’ Section 125 Plan.
4. If the plan is self-covered by your company (used for ACA reporting), put a check mark next to Self Covered Plan and in the Self Coverage Origin dropdown box, choose the correct plan origin.
5. Enter the Priority of the plan in relation to other insurance plans.
6. If applicable, put a check mark next to Treat Multiple Children as a ‘Child’ plan (w/no Spouse) in order to tally multiple children under a Child plan when no spouse is covered. The Coverage Start and Coverage End dates are informational fields on when the plans are effective (IE: hire date, 3 months after hire date; end of month of termination, employee termination date). Benefit plans determine eligibility when adding to employees.
The following fields are for informational use and can be filled in/selected as appropriate, if needed - Plan Code, COBRA?, Require 834 File, Policy Number, Group Number and Eligibility Code.
EE/ER Contrib
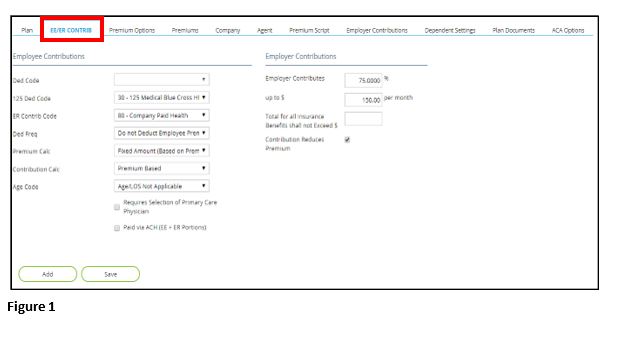
Within the second sub-tab, EE/ER Contrib (Figure 1), you will select any information that pertains to the employees’ contribution regarding this plan; and any information that pertains to the employer’s contributions (Figure 1).
1. Under the Employee Contributions section:
a. If the S125 Qualified? box was not checked within the Plan sub-tab, click on the dropdown box next to Ded Code and choose the non-125 deduction code associated with the insurance plan (leave blank if the health plan is pre-tax).
b. If the S125 Qualified? box was checked within the Plan sub-tab, click on the dropdown box next to 125 Ded Code and choose the 125 deduction code associated with the insurance plan (leave blank if the health plan is not pre-tax).
2. Select the memo earning code to track employer paid health contributions in the dropdown box next to ER Contrib Code.
3. Select the frequency to deduct, per payroll, the employees’ deductions within the dropdown box next to Ded Freq (leave blank if only using insurance for affordability).
4. Select the appropriate calculation method for how the premiums of the plan are derived within the Premium Calc dropdown box.
5. Choose how the employer contributions will be based within the Contribution Calc dropdown box.
6. Choose the appropriate date to use for the calculation of premiums on an age banded plan, within the Age Code dropdown box.
7. Select any boxes below this dropdown box, should they pertain to this particular plan (Requires Selection of Primary Care Physician and/or Paid via ACH).
8. Under the Employer Contributions section, enter the amount of money the employer contributes in the Employer Contributes box and enter the maximum monthly employer contribution in the up to $ box (leave blank if based on contributions table).
9. Mark the box next to Contribution Reduces Premium if the employer contributions (within the Employer Contributions sub-tab) should reduce the total monthly premiums (within the Premiums sub-tab).
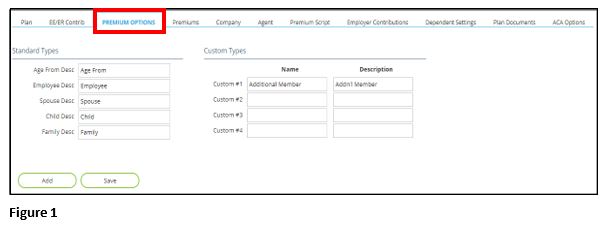
Premium Options
Within the third sub-tab, Premium Options (Figure 1) is where you will establish the column headings for the different coverage types and their premiums within this plan (IE: Employee only, Spouse, Child, Family). As a default, under the Standard Types section, if any employer premium contributions will be applicable, depending on the plan’s coverage:
- Age From will be listed in the Age From Desc box
- Employee will be listed in the Employee Desc box
- Spouse will be entered in the Spouse Desc box
- Child will be entered in the Child Desc box
- Family will be entered in the Family Desc box.
If any of these column headings need to be removed for this particular plan, delete the wording in any of the non-applicable boxes. Under the Custom Types section, if there are any other custom employer contribution headings that are applicable, enter them within the Custom #1 through Custom #4 boxes.
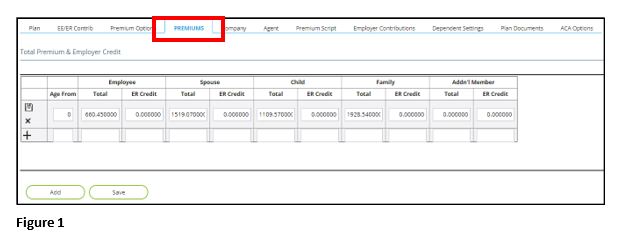
Premiums
Within the fourth sub-tab, Premiums (Figure 1), enter the total premiums each pay period for the plan, based on the columns which were set up within the Premium Options sub-tab. These premiums will be visible to the employee when they’re on the ESS kiosk, selecting their benefits. The amounts entered should be the total of both employee and employer contributions unless the Contribution Reduces Premium check box is not marked on the EE/ER Contrib sub-tab, or if employer portions are not to be tracked in the system. If there are any employer credits, enter them in the second section of each column. To add a new row, click on the Plus icon (+) on the left side of the screen. Once all amounts have been entered, click on the Save icon on the left side of the screen. If a row needs to be deleted, click on the Delete icon (X) on the left side of the screen.
Company
Within the fifth sub-tab, Company, this is where you can enter the insurance company’s name and contact information, within Insurance Company, Address, City, State and/or Zip.
Agent
Within the sixth sub-tab, Agent, this is where you can enter the insurance agent’s name and contact information, within Agent Name, Address, City, State, Zip, Contact Name, Phone, Fax and/or Email.
Premium Script
The seventh sub-tab is not needed for setting up benefits. Premium Script is where your service bureau can calculate your company’s own insurance, through the use of scripting, when the system’s setup options are not enough. Custom premium scripting is not available for use with the ACA affordability and minimum essential coverage determinations.
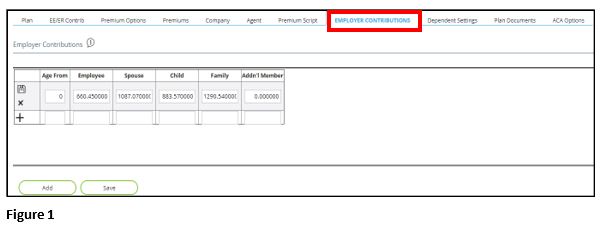
Employer Contributions
Within the eighth sub-tab, Employer Contributions (Figure 1), this is where you will enter the employer paid amount for each level of plan structure. The column headings that reflect were previously setup within the Premium Options sub-tab. To add a new row, click on the Plus icon (+) on the left side of the screen. Once all amounts have been entered, click on the Save icon on the left side of the screen. If a row needs to be deleted, click on the Delete icon (X) on the left side of the screen.
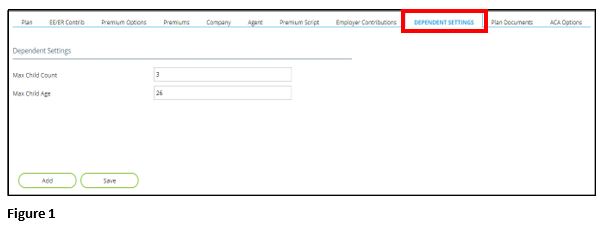
Dependent Settings
Changing the Dependent Settings (Figure 1), within the ninth sub-tab, will alter the calculation of plan premiums by dictating maximums to the allowed coverage.
1. When making changes to this sub-tab, it will be necessary to click the Recalculate Employee Deductions button (located on the Plan sub-tab), in order to update coverages and premiums.
2. Enter the total number of children that may be covered under any segment of the plan, within the Max Child Count box.
3. Enter the maximum age of a child dependent that can be covered under the plan, within the Max Child Age box.
4. In order to make sure added and/or changed dependents are automatically added to the system and can be included when employees are electing their benefits, it’s a good idea to configure the approval level for dependents.
5. To make sure this is set correctly, click on ESS. Within the next screen that pops up, click on the Admin tab, then within the Approval Configuration subtab, select the Configuration option.
6. Click on Dependents and select the box below Approval Not Required. When complete, click on Save.
Plan Documents
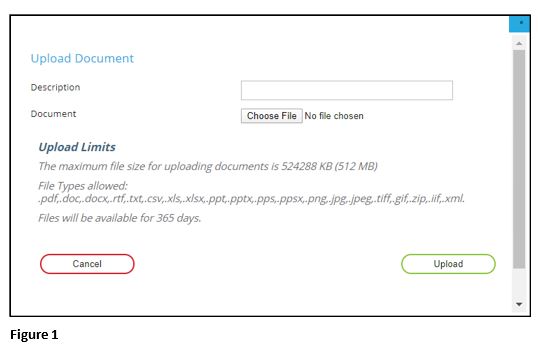
1. Within the tenth sub-tab, Plan Documents (Figure 1), this is where you can attach plan documents within each plan you add (IE: outlines of a benefit plan). This is any documentation you would like to appear on the open enrollment screen for that specific benefit type. Guidelines and requirements for documents that can be uploaded are listed once you click on Upload File.
2. Within the popup window, add a Description of the document that will be uploaded and select Choose File to upload the necessary document.
3. Click Upload when complete.
4. Once the document has been uploaded, click on the Save icon on the left side of the screen.
5. If the document needs to be deleted, click on the Delete icon (X) on the left side of the screen; and if you’d like to view the document, click on the View Doc icon on the left side of the screen.
ACA Options
Where it is applicable, there may be an eleventh sub-tab, ACA Options. Coverage Code Override, Meets Minimum Essential Coverage (ACA), Provides Minimum Value (ACA), Min Cost Plan, Affordability Calc Method, Qualifying Offer Method (if any)
Eligibility Rules
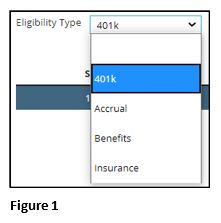
Eligibility determines who will be shown a package offer. If your company is offering only one benefit package to the entire company, you will only need to make one eligibility rule; if you have different subsets of your employee population receiving different benefits (IE: salaried employees are offered different benefits than hourly employees), then you will need to make multiple eligibility rules. To begin, click on Add and select the type of eligibility rule you will be making in the dropdown box next to Eligibility Type (401k, Accrual, Benefits, Insurance) (Figure 1).
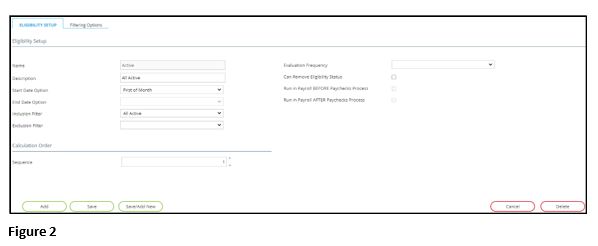
With the Eligibility Setup subtab:
1. List the Name of the rule and a brief description of the intent of the rule in the Description box (Figure 2).
2. Within the Start Date Option dropdown box, select when an employee would become eligible for this rule.
3. In the End Date Option dropdown box, select when this rule will no longer be effective.
4. Within the Inclusion Filter dropdown box, select the employee group that this rule will apply to (group options will have already been set up within Company: Status/Filter, Emp Filters).
5. Within the Exclusion Filter dropdown box, select any group of employees that this rule would not apply to.
6. Under the Calculation Order section, there is the option to change the sequence of the rule. Sequence can only be changed after the rule has been saved.
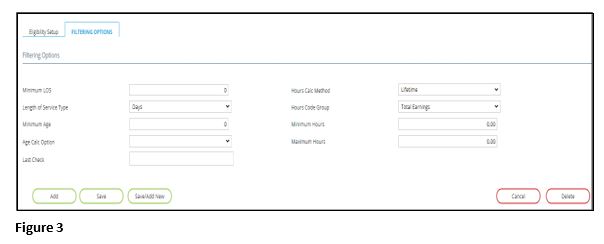
Additional eligibility filtering requirements may be built by populating any of these applicable fields (Figure 3).
1. Within the Filtering Options subtab, enter a numeric value if a minimum length of service is required, within the Minimum LOS box.
2. Select the unit of time used in the Minimum LOS field by clicking on the dropdown box next to Length of Service Type.
3. Enter a Minimum Age for eligibility, if applicable.
4. Select the date upon age eligibility should be factored by clicking on the dropdown box next to Age Calc Option ??????.
5. Last Check ??????, select the timeframe hours that should be counted for eligibility, if applicable, by clicking on the dropdown box next to Hours Calc Method.
6. Select a code group to calculate hours based on eligibility, if applicable, by clicking on the dropdown box next to Hours Code Group.
7. Enter the minimum number of hours an employee should work before the eligibility begins, by putting a number in the Minimum Hours box.
8. Enter the maximum number of hours an employee should work before the eligibility ends, by putting a number in the Maximum Hours box.
9. Once completed, click on Save.
Benefit Packages
Benefit packages are used to group together the benefit options being provided to a group of employees using the insurance plans and eligibility rules set up in prior steps. When you set the open enrollment start date and end date on the benefit package, this is what is going to “turn on” what the employees will see, and the timing of when they will see open enrollment on the ESS kiosk. Benefit packages may also be used to drive ACA Calc Methods and ACA Qualifying Offer Methods.
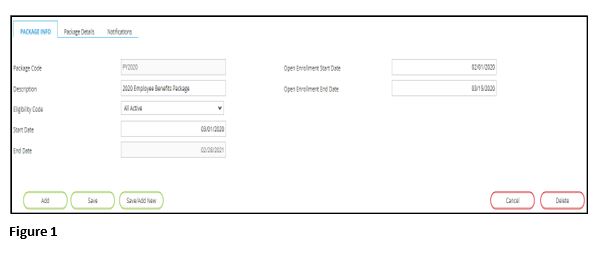
1. Click on Add.
2. Within the Package Info subtab, list the package benefit name within the Package Code box and enter a brief description of the package details in the Description box (Figure 1).
3. Select the Eligibility Code that is applicable to the package offering (this code was setup in the Eligibility Rules directions, provided above).
4. Enter the effective dates of the benefit package offering in Start Date and End Date.
5. Enter the effective benefit open enrollment dates in Open Enrollment Start Date and Open Enrollment End Date.
6. Once completed, click on Save.
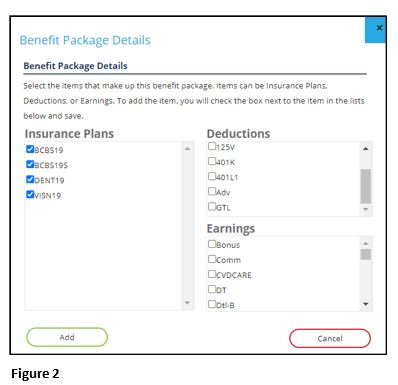
In order to add the benefit plans that will pertain to this specific package, go to the Package Details subtab.
1. Click on Add in the bottom left section of the screen and a window will pop up (Figure 2).
2. Select the insurance plan(s) that will be a part of the offered benefits package by marking the appropriate check boxes.
3. The Deductions and Earnings sections may be selected, but they are not part of the open enrollment process. Keep in mind that insurance plans may already have deductions and earning codes tied to them, so it would not be necessary to include them here.
4. Once completed, click on Add.
Within the Notifications subtab, this is where you can customize the notifications that employees will receive via email pertaining to the different timings regarding the open enrollment process (Figure 3).
There are three built-in notification types:
- Open Enrollment Announcement notification, letting employees know that the open enrollment period will be beginning (defaults to notification being sent out 1 day prior to open enrollment).
- Open Enrollment Begins notification, letting employees know that day that open enrollment has begun.
- Reminder to Complete Open Enrollment notification, letting those employees who have not yet submitted their open enrollment that they have a limited time left to complete their open enrollment (defaults to notification being sent out 1 day prior to the end of open enrollment).
As a default, all three of these notifications are enabled whenever a benefit package is added. If a notification needs to be disabled, click on the blue box below Enabled on the left side of the screen.
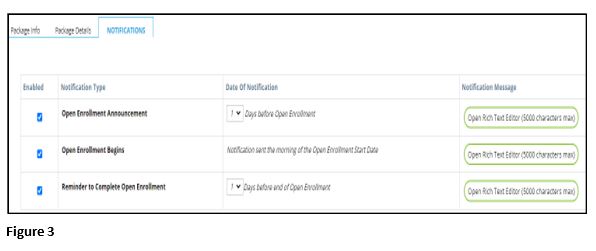
Each notification has a default message that will be included in the e mail notification:
([Employee First Name] [Employee Last Name], This message is being sent to you automatically via [Application Name]. This message is to inform you that open enrollment will begin on 06/03/2020 / has started / will end on 07/03/2020).
If a custom message would rather be sent:
1. Click on the Open Rich Text Editor button next to the appropriate notification type (Figure 4).
2. Within the text editor box, enter the custom message (5000 character maximum).
3. Click on Close when complete.
Employees who have registered on ESS will receive these notifications (as the notifications are dependent on the email accounts being established on ESS) and will be able to complete open enrollment, so be sure to verify all employees within your company who have the opportunity to do open enrollment have all registered on ESS.

ACA Setup
Member of Aggregate Group?, Authoritative Transmitter, Validation Setting, Forms Delivery Method, Affordability Calc Method, Affordability Calc Frequency, FTE Determination Method, Qualifying Offer Method (if any)
ALE Members
Company Code, Name, EIN, Begin Date, End Date
Workers Comp Codes
Code, Description, Is Secondary Code?, Secondary Code, Threshold Rate (per hour)
Workers Comp Rates
Worker’s Comp Codes – Add Code; Worker’s Comp Rates – Add Rate
Details; Factors
Open Enrollment Setup
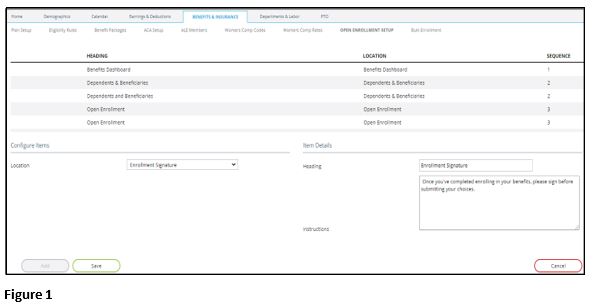
Make sure all employees going through open enrollment process have enough information to complete everything without questions. This section allows you to create custom information and custom instructions which appear on several of the screens during the enrollment process. All of these areas can be updated anytime during the open enrollment process (IE: you get questions from employees during the process and you want to add this further information for all other employees to see during the process). The locations where the information or instructions can be added to the employees’ open enrollment tasks include: Dependents & Beneficiaries, Open Enrollment (heading area), Benefits Dashboard, Enrollment Signature, Benefits Qualifying Event and Review & Submit.
Open Enrollment Setup
1. Click on Add (Figure 1).
2. Click on the dropdown box next to Location and choose where the information/instructions will go.
3. Add a Heading and list any specific directions in the Instructions box.
4. When complete, click on Save.
Benefit Enrollment Dashboard
The Benefit Enrollment Dashboard gives you one place where you will be able to see all of your employees who are eligible to receive benefits and where they are in the enrollment process.
To access the Benefit Enrollment Dashboard:
1. Click on Dashboards on the Home page.
2. Click on the Benefit Enrollment Dashboard subtab (Figure 1).
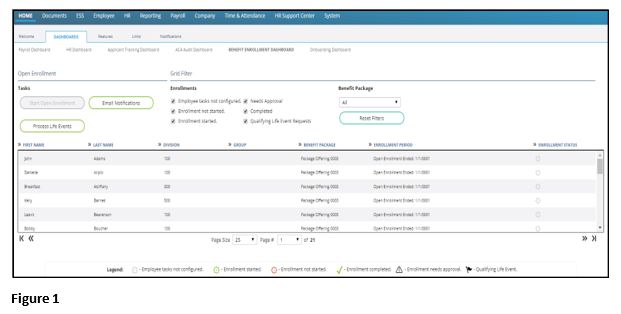
Open Enrollment Section
Under the Open Enrollment section, there are three tasks:
- Start Open Enrollment
- Email Notifications
- Process Life Events.
Starting the Open Enrollment Process for Employees
1. Click on the Start Open Enrollment button which will allow employees who log onto ESS to go to the benefits open enrollment page and start their benefit selection.
2. Select a Benefit Package in the dropdown box.
3. Click on the Start Open Enrollment button. You will then receive an informational message on the screen listing all of the employees who have received email notifications that they can begin their benefit enrollment process on the ESS.
4. When clicking on Email Notifications, you will be sent back to the Company: Benefits Package page.
5. Within the Notifications subtab, you can double check the email notifications setup for each benefit package and review when each email notification will be sent out. Currently, there is not an option to individually send out email notifications to specific employees, but this may be an added feature in the future.
If you have any employees on the dashboard who have a Qualifying Life Event enrollment status (reflected on the right side of the screen), you can process this life event by
1. Clicking on the Process Life Events button will launch the Employees With Qualifying Life Events box (Figure 1). The qualifying life event(s) that pertains to the employee is reflected under Employee Event(s).
2. Next to the Select an Offering, choose the benefit package which pertains to the employee.
3. Next to Starting On, choose the date that this employee can start selecting their benefits, based on their qualifying life event.
4. Put a check mark next to all of the insurance plans that this employee can choose from.
5. Once completed, click on Approve Special Enrollment.
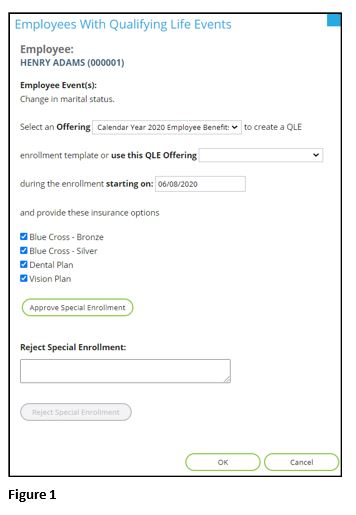
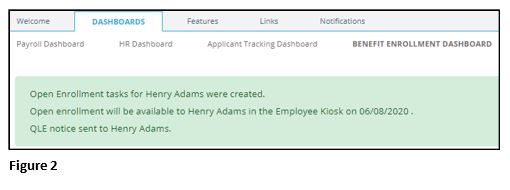
Once you have clicked on the Approve Special Enrollment button, you will receive a message on the screen reflecting this employee’s tasks were created and they were notified (Figure 2). They are now able to go onto the ESS kiosk and select their benefits. If the employee’s qualifying life event is not approved for them to re-elect their benefits, enter a reason within the Reject Special Enrollment box and click on OK when complete (Figure 1).
Grid Filter Section
Under the Grid Filter section, there are filtering options that can be changed to reflect what is shown on the Dashboard (Figure 1). As a default, all six Enrollment boxes are always checked, but you can unselect any of them to filter what’s reflected in the Dashboard. The Benefit Package dropdown box defaults to All, but it can be changed by selecting any other plan in the dropdown box. If you change any of the Enrollments or Benefit Package selections and you’d like to set the filters back to the default filters, click on Reset Filters.
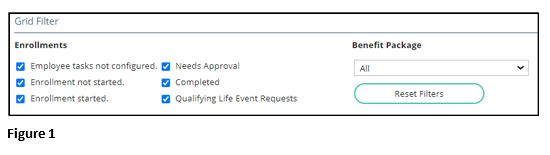
The Dashboard has set columns, but by clicking on the arrows next to each of the columns, you can filter the plans by each of the columns:
- First Name
- Last Name
- Division
- Group, Benefit Package
- Enrollment Period
- Enrollment Status.
Each row on the Dashboard reflects an icon on the far right of the screen, which shows where in the enrollment process the employee is at (Figure 2). A legend for these icons is at the bottom of the screen.
Benefit Enrolling Overview
This is where employees will select and submit their benefits on the ESS kiosk during the open enrollment timeframe.
Employee Tasks
The employee will receive an email letting them know that the open enrollment process has begun and that they can access the ESS kiosk and begin selecting their benefits .
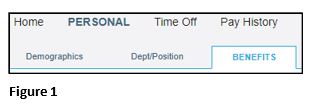
1. Once employees have logged onto the kiosk, they will click on the Personal tab.
2. Select the Benefits subtab (Figure 1).
3. They will then be taken to the Open Enrollment screen, where they will need to go through each of the tasks, which are reflected on the left side of the screen. Detailed instructions for some of the tasks can be viewed within the Instructions box on the top of the screen.
4. Once each task has been completed, click on Next, located in the bottom right section of the screen.
5. Any task can be revisited anytime by clicking on Previous, located in the bottom left section of the screen.
Beneficiaries
Beneficiaries is where the employee will need to either add or update their dependents and/or beneficiaries, so they can be used when they elect their benefits (Figure 2).
1. To begin, they will click on Add and will then enter all of the necessary information for this person.
2. Depending on the person’s status, they will put a check mark next to Dependent and/or Beneficiary.
3. Once complete, click on Save.
4. To add more names, repeat the steps above.
5. Once completed, click on Begin Open Enrollment. If they do not have any dependents and/or beneficiaries, they can just click on Begin Open Enrollment, to move to the next task.

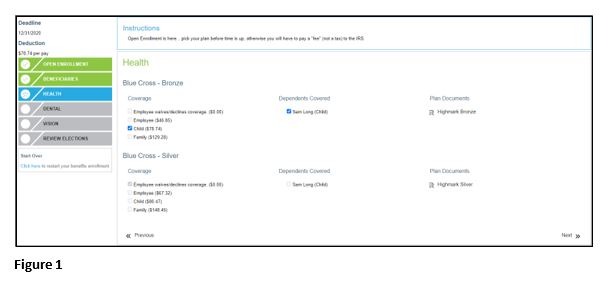
Health Task
Within the Health task, one must select which medical/health plan they want to choose from (Figure 1).
1. Under the Coverage section, they can either select
*Employee waives/declines coverage, where they will not receive any company medical/health benefits.
*Employee, where only the employee is covered by the company medical/health benefits.
*Child, where the employee and any children (which can be selected/unselected under the Dependents Covered section) are covered by the company medical/health benefits
*Family, where the employee and their entire family are covered by the company medical/health benefits.
2. The premiums deducted each pay period for each of the elections are shown next to each Coverage option.
3. Under the Plan Documents section, they can open the attachment(s) to review specific details about the plan(s).
4. Once completed, click on Next.
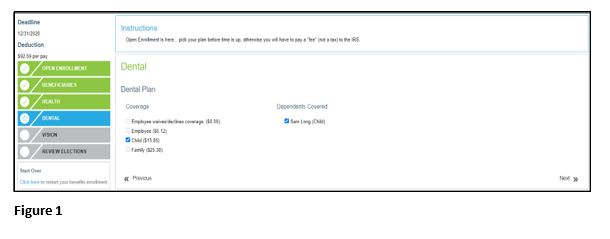
Dental Task
Within the Dental task, one must select which dental plan they want to choose from (Figure 2).
1. Under the Coverage section, they can either select
*Employee waives/declines coverage, where they will not receive any company dental benefits.
*Employee where only the employee is covered by the company dental benefits
*Child, where the employee and any children (which can be selected/unselected under the Dependents Covered section) are covered by the company dental benefits.
*Family, where the employee and their entire family are covered by the company dental benefits.
2. The premiums deducted each pay period for each of the elections are shown next to each Coverage option. If any documents pertaining specific details about a plan have been uploaded, they will reflect under the Plan Documents section.
3. Once completed, click on Next.
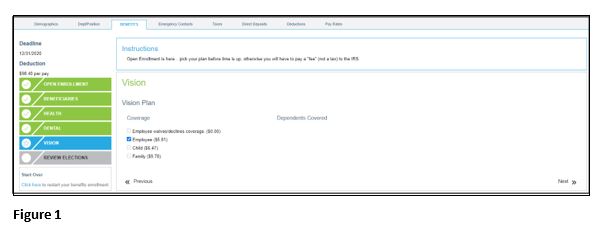
Vision Task
Within the Vision task, one must select which vision plan they want to choose from (Figure 1).
1. Under the Coverage section, they can either select:
*Employee waives/declines coverage, where they will not receive any company vision benefits.
*Employee, where only the employee is covered by the company vision benefits.
*Child, where the employee and any children (which can be selected/unselected under the Dependents Covered section) are covered by the company vision benefits.
*Family, where the employee and their entire family are covered by the company vision benefits.
2. The premiums deducted each pay period for each of the elections are shown next to each Coverage option. If any documents pertaining specific details about a plan have been uploaded, they will reflect under the Plan Documents section.
3. Once completed, click on Next.
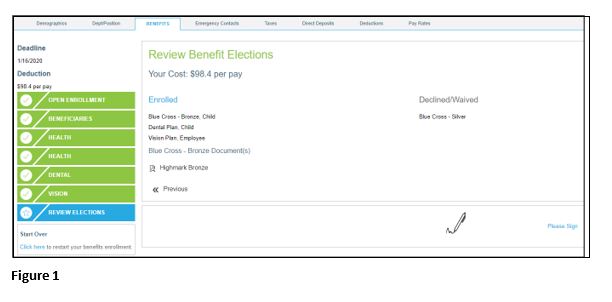
Review Elections
The final task, Review Elections, is reviewing one’s elected benefits before submitting them (Figure 1). Here they will see all of the benefit elections they have made, any benefit elections they have declined/waived and how much will be deducted each pay period. They will also be able to see any plan documents for any of the benefits they’ve enrolled in. In case any changes need to be made before submitting their benefits, they can restart the benefit enrollment process by clicking on Click here, located in the bottom left section of the screen. If one does not complete electing their benefits before logging off of the system, their elections will not be saved and they will have to start the process all over. To submit their benefits, click on Please Sign.
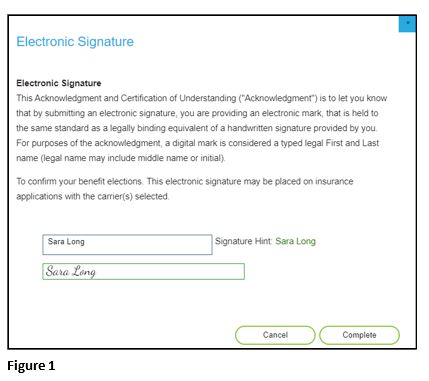
Electronic Signature
The next screen that pops up is an Electronic Signature page, which confirms the benefit elections that will be electronically signed by the electronic submission (Figured 1). They will need to type their name into the Signature box, then hit Complete.
After this has been done, the employee’s benefit elections will be sent through the system and the status of each task will reflect on the company’s Benefit Enrollment Dashboard. If needed and if it’s within the open enrollment timeframe, one can log back onto the kiosk and reselect their benefit options, selecting the option to restart open enrollment.