Applicant Tracking for Administrators Using tmsPay
Applicant Tracking Instructions
Client Tasks for Applicant Tracking
Applicant Tracking Overview
Applicant Tracking is the process of creating, posting and managing posted jobs within the software system. Once applicants apply for positions, they can be managed and communicated with from the application process to the hiring process. Setting up Applicant Tracking is a simple, yet effective way to make sure that applicants go through a friendly, easy flow process before potentially being hired. With your company specifications, we can assist you with setting up Applicant Tracking for your company.
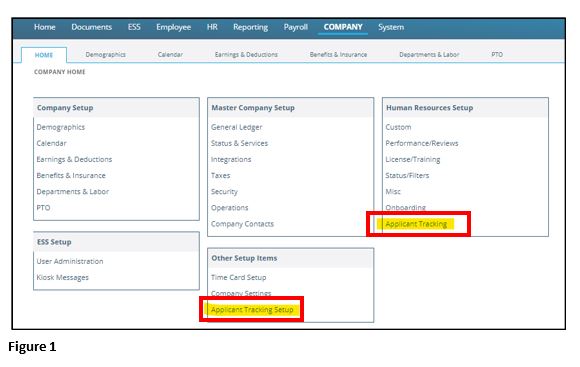
Once AT has been added as a service for your company, click on the Company tab again. Under the Human Resources Setup box, there will be a hyperlinked AT selection; and under the Other Setup Items box, there will be a hyperlinked AT Setup selection (Figure 1). Further instructions are provided below, but in short, clicking on AT Setup will take you to areas where you will be setting up specifications for your company’s applicant tracking and posting of positions. Once these specifications have been set up, clicking on AT will allow you to post positions and access the AT Dashboard.
When setting up AT, it’s helpful to have the following information ready:
1. A description of your company.
2. Logo files for your company.
3. Social media links for your company.
4. Job descriptions.
5. Job requirements.
6. Specific job questions.
Company Demographic Setup
Setting up your Demographics will provide information about your company, much of which will be included in position postings. This is where you can set up a biography of your company, include a company logo and link future position postings to social media sites your company is affiliated with. To set up your Demographics, click on the Company tab and then click on the hyperlinked Demographics selection under the Company Setup box.
Demographics
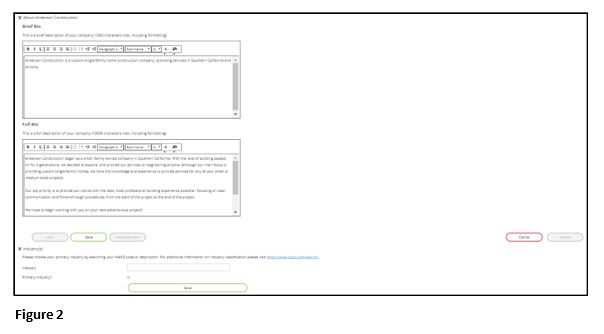
The first subtab is Demographics, which has 3 different sections. To open or close any of the sections, click on the arrows to the left of the section name. The Demographics section includes your company’s general information. Most of your company’s general demographic information has already been populated. If you find any of this information needs to be changed, please contact your service bureau. Within the About section, this is where you can list a brief description of your company in the first box, only 1 or 2 lines; and you can also list a full description/bio of your company in the second box, which will appear at the top of all position postings (Figure 2). Once completed, click on Save. Within the Industry(s) section, this is where you’ll choose your primary industry that classifies your company for the North American Industry Classification System (NAICS). Type in the NAICS code or description, choose the best option(s), select the box next to Primary Industry?, if applicable, and then click on Save.
Media
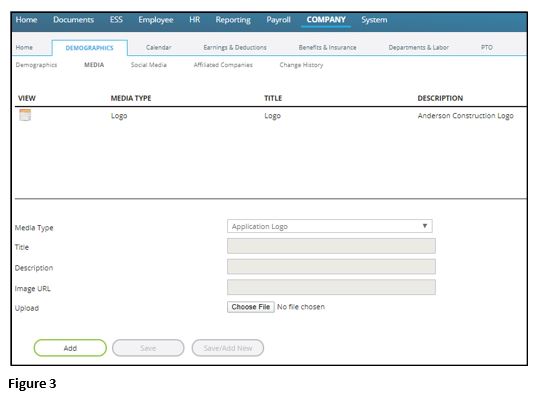
The second subtab is Media, where you can upload a company photo, video or logo, which will appear at the top of each position posting. Click on Add, then select the Media Type (Application Logo, Logo, Photo or Video). Then insert a Title and a Description. If necessary, include the Image URL. Upload the file by clicking on Choose File. Once completed, click on Save (Figure 3).
Social Media
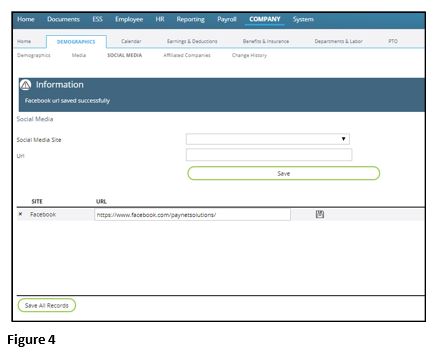
The third subtab is Social Media, where this allows you to set up all the URLs for different social media sites (LinkedIn, Twitter, Facebook, etc.). Each position posting will have a corresponding icon that will reflect in the posting, pertaining to whatever social media sites your company sets up in this section. This provides applicants with direct links to sites about your company so they have more information about who they are applying to work for. Select the applicable Social Media Site in the dropdown box. In the URL box, enter the full site address, then click on Save (Figure 4). The Affiliated Companies and Change History subtabs do not pertain to anything with AT, so they are not applicable right now.
Company Contacts
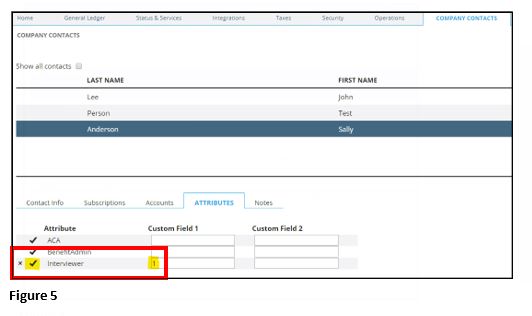
Within another section of setting up AT for your company, you’ll need to designate who will be an interviewer for applicants applying for jobs. To set this up, click on the Company tab and then click on the hyperlinked Company Contacts selection under the Master Company Setup box. On this page, highlight the contact(s) you will be designating as an interviewer(s) (Figure 5). Within the Attributes section, on the line that reflects Interviewer, click on the check mark to the left of Interviewer ( ). This will designate this contact as an interviewer. You will then put a one (1) in the Custom Field 1 box, next to Interviewer. Once completed, click on the check mark again, to the left of Interviewer, as this saves the changes you just made. To remove this contact from being an interviewer, click on the ‘X’ to the left of the check mark. Make sure this contact is marked as Active within the Contact Info section, or they will not be able to be an interviewer. If Interviewer is not reflected within the Attributes section, contact your service bureau.
Positions
Within another section of setting up AT for your company, you will need to add all positions that applicants can apply for. Positions are super important to the AT process because AT is based on positions within your company and whether they have been made available for AT. To set this up, click on the Company tab and then click on the hyperlinked Departments & Labor selection under the Company Setup box. Within this section, click on the Positions subtab.
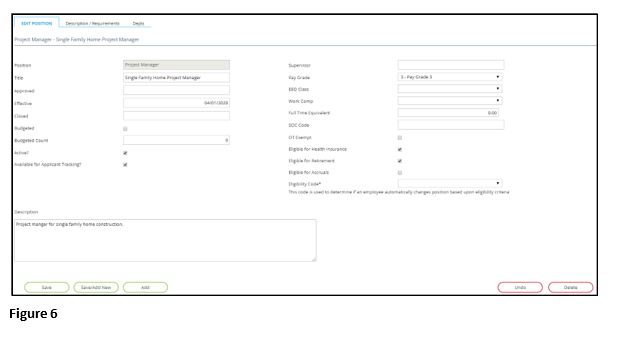
Within this subtab, there are 3 sections to fill out (Figure 6). To begin, click on Add. In the Edit Position section, insert the position’s code next to Position; and insert the position’s name next to Title (Positions and Titles can be the same, but sometimes they are different or Positions are given codes and then the Title would reflect the Position’s name). Select the Budgeted box if the position is included in your company’s budget and list the number of budgeted positions next to Budgeted Count. If this position is actively open, select the box next to Active?. If the position is to be Available for Applicant Tracking?, select this box. If either of these boxes are not selected, the position will not be considered for AT. Additional position info is available for your usage, which includes the following: If the position needs to have an Approved date, an Effective date and/or a Closed date, list these accordingly. On this same section, list and/or select any options on the right side of the screen, which pertain to this particular position. In the Description box, list a brief description of the position (a more detailed description will be entered in the next step).
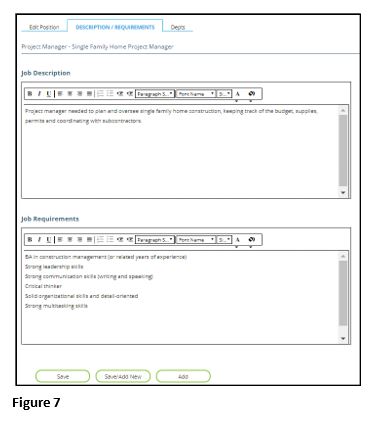
In the Description/Requirements section, you will list this position’s description in the Job Description box (Figure 7). In the Job Requirements box, you will list all the specific requirements for this position. AT pulls its information about positions from this section, so you will want to list as much information as possible to give clear explanations to applicants once the position has been posted. All of this information is reflected when this position is posted and when an applicant applies for the position.
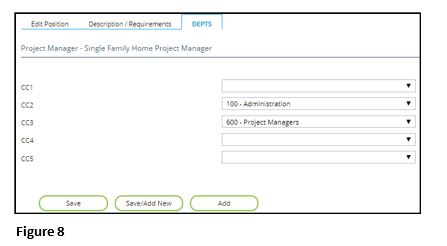
In the Depts section, you can select any of the Cost Centers that this position will pertain to (Figure 8). The Cost Centers do not need to be selected at this time, especially if you are posting a generic position which could pertain to more than one Cost Center for your company. Once everything has been selected and chosen for this position, click on Save.
Applicant Tracking Setup
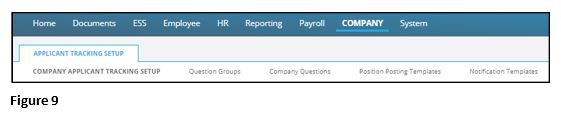
Configuring AT consists of different steps which include setting up the tasks an applicant will go through when applying for a position, setting up general company questions and specific position questions, setting up templates for positions and setting up notifications to send to applicants throughout the application process (Figure 9). To set these things up, click on the Company tab and then click on the hyperlinked Applicant Tracking Setup selection under the Other Setup Items box.
Company Applicant Tracking Setup
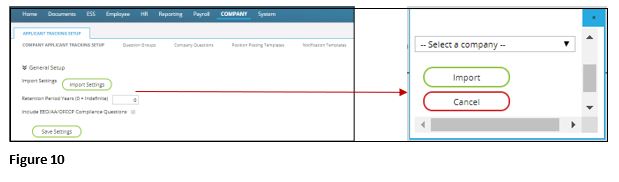
The first subtab, Company Applicant Tracking Setup, includes items which are typically accessed once, during set up. It is where you establish what steps applicants might go through during the application process and interview process. You also set up the reasons an applicant would be rejected. Within this first subtab, there are 3 different sections. To open or close any of the sections, click on the arrows to the left of the section name. When AT is first added as a service, there’s the option to Import Settings from another company, under the General Setup section. This is where a template comes in handy, so there are defaults that a company can use to help assist with setting up AT. If there is a group of companies you have, which will be using AT, and you want all the companies to have the same setup, configure everything for one company and then import these settings to the remainder of the companies in the group. In this way, every company is set up the same and the process is streamlined. Please contact your service bureau if you wish to import these settings from a template. To import settings, click on Import Settings under the General Setup section, select the company of your choice from the dropdown list and click on Import (Figure 10). The Retention Period Years is how long you are requesting the system to hold the position and candidate information for. Zero (0) is indefinite or you can put another number of years in. If you want to include gender, ethnicity, citizenship, Veteran status and disability status questions for applicants to answer, select the box next to Include EEO/AA/OFCCP Compliance Questions. If this is something you would like applicants to answer at another time during their applicant or hiring process, do not select this box.
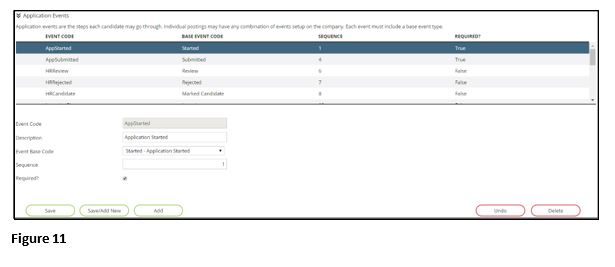
Under the Application Events section, this is where you will define all of the necessary steps an applicant may/will go through during the application process. This is the full listing of all the different steps you will have in your application process, remembering that applicants can go through different processes depending on the position they’re applying for. You can assign application events to position postings individually or they can be marked Required? so that they are used on all posted positions. If they are not marked required, when you go to post a specific position, you can select specific application event(s) at this time. If you imported settings, you will see all of the codes and you are able to change the codes’ information, if needed, except for the Event Code. If no codes are reflected, click on Add. Enter an Event Code and then enter a Description, which describes what the specific event is. The Event Base Code is used to display the applicant code by type in the AT Dashboard. You can use event base codes multiple times (IE: Interview for phone interview, in-person interview, Skype interview). The Sequence is automatically populated from the last event code that was made (Figure 11). Once completed, click on Save.
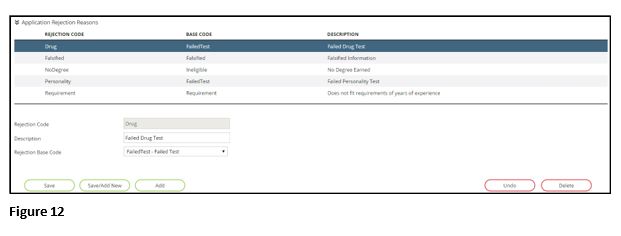
Under the Application Rejection Reasons section, this is where you add all of the rejection reasons that are possible for not hiring an applicant. Reasons can be added at any time, in case not all reasons are thought of during setup. If you imported settings, you will see all of the codes and you are able to change the codes’ information, if needed, except for the Rejection Code. If no reasons are reflected, click on Add. Enter a Rejection Code and then enter a Description, which describes what the specific rejection reason is. The Rejection Base Code is used to display the applicant code by type in the AT Dashboard. You can use rejection base codes multiple times (IE: Failed Test for failed drug test, failed personality test) (Figure 12). Once completed, click on Save.
Question Groups
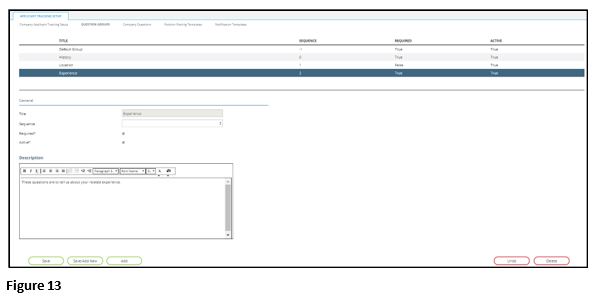
When an applicant goes into the system and they create a profile in order to apply for a job, they can be asked a series of questions, where these questions can be broken up into different sections, also called Question Groups, which is the second subtab on the AT Setup page (Figure 13). What these are, are groupings or sections of questions. When setting up question groups, it is important that you change the description for each group because the description displays on the page, as it is like instructions for the applicant on what to do with each section of questions – how to answer the questions, tips/hints, whatever you want to say about the questions in that group. To begin, click on Add. List the name of the question group in the Title box. The Sequence is automatically populated from the prior question group that was made. If you want this question group to be required for an applicant to answer, select the box next to Required?. If this question group is to be active on a position posting, select the box next to Active?. In the Description box, provide instructions to the applicant for how they will answer this particular group of questions. There is a Default question Group which is already set up in the system. It has to be there, since it is for all questions which are asked of an applicant, in case no other question groups are made. Once completed, click on Save.
Company Questions
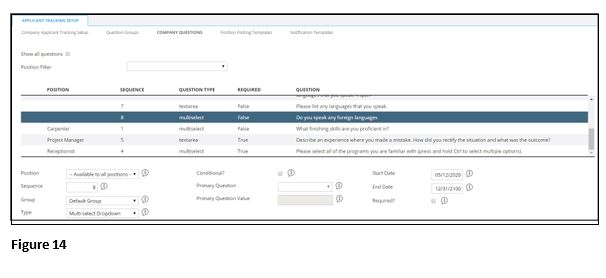
The third subtab, Company Questions, is where you can add what questions you would like to ask your applicants. You can add questions which apply to all applicants, or you can tie questions to specific groups of applicants and/or to specific positions. At the top of the page there’s a Show all questions box to select if you want to see all the company questions (Figure 14). If you would like to filter the questions by position, click on the dropdown box next to Position Filter and choose the appropriate position.
To begin, click on Add. If this question is specific to a certain position, select the dropdown box next to Position and choose the appropriate position. If you leave this blank, this question will apply to all applicants. The Sequence, which is automatically populated from the prior question that was made, defines the order, by numeric value, that this question is going to appear in. Some default company questions are already built into AT for when an applicant finishes the first phase of their profile in the AT system (IE: full -time/part-time position desired, expected salary, desired start date, willingness to travel, willingness to relocate, skills and referral name). If you do not want this question to appear in the default question group for the applicant, select the appropriate Group.
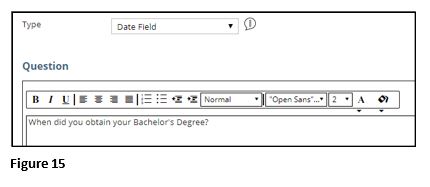
When selecting the Type, there are different options to choose from, depending on what question is being asked and how you’d like the applicant to respond. If they need to enter a date as an answer, choose Date Field (Figure 15).
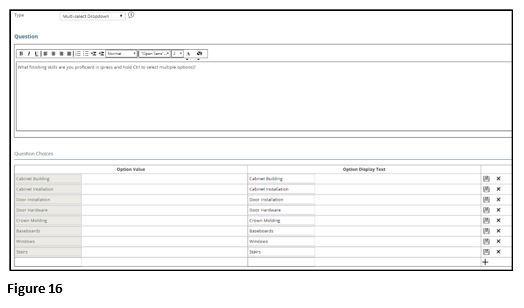
If they need to have the option to select multiple answers, choose Multi-select Dropdown (Figure 16). Further instructions on how to fill out the Question Choices section are listed below.
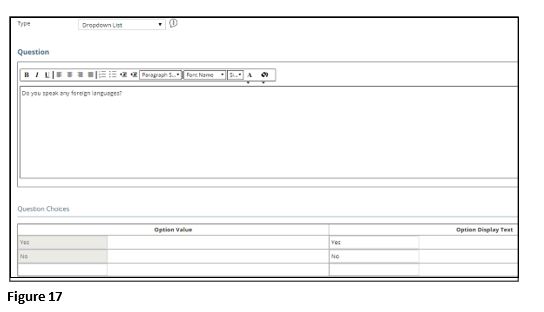
If they need to select yes or no from a dropdown, choose Dropdown List (Figure 17). Further instructions on how to fill out the Question Choices section are listed below.
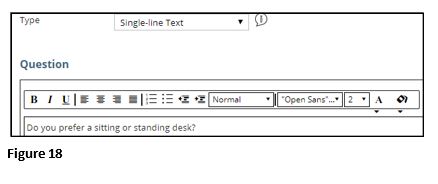
If they need to enter a short answer, choose Single-line Text (Figure 18) If they need to answer a lengthy question, choose Multi-line Text (IE: Describe an experience where you made a mistake at work and how did you rectify it with your supervisor?).
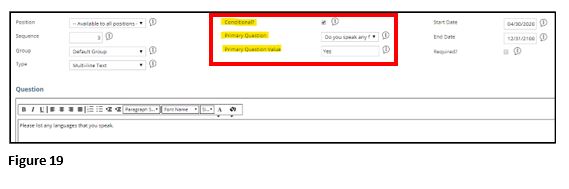
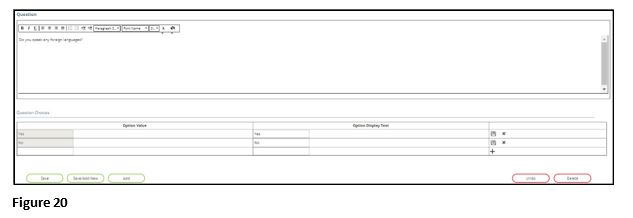
You can make some questions conditional upon another question, based on the applicant’s answer. As you set up the conditional question, you set it up to be conditional based upon the answer to another question that has already been set up (Figure 19). Based on the answer of the first question, then this would trigger whether or not the conditional question would be asked. Conditional questions can only be used with the following Types of questions – Date Field, Multi-select Dropdown or Dropdown List. For example, the original question is ‘whether one speaks any foreign languages’; the conditional question is to ‘list all languages that one speaks’. You would select the box next to Conditional? The Primary Question you would select in the dropdown box would be ‘whether one speaks any foreign languages’. In the Primary Question Value box, you would put ‘yes’, as this is the answer from the original question that makes this conditional question appear to the applicant. Questions do have start dates and end dates. Select the Start Date that the question will be effective. The End Date defaults to 2100, but if this is a question, for example, that can be asked this year, but not next year, for compliance reasons, you can set the end date to the end of this year. You can select whether the question is required to be asked in the question section of the application process. If you do not mark Required?, then the applicant can simply bypass this question within the application process.
Based on the question Type, you will then be presented with a Question text editor box and possibly a Question Choices area to add applicable responses (Figure 20). Within the Question text editor box, you will type out what you want the question to say. You have a full text editor where you can make changes to the question itself. Currently, the different fonts may not reflect in the text editor box, but they will reflect within the question on the posted position. Depending on the question type, you may have Question Choices, below. Within the Option Value column, list your answer in the first row. The Option Display Text column will most likely be the same verbiage as what you listed in the Option Value column. Once completed, click on the plus sign icon (+) in the far right box. If you make any changes to the text, click the save icon; if you want to delete the choice, click on the delete icon, both in the far right box. Once everything is completed for this question, click on Save.
Position Posting Templates
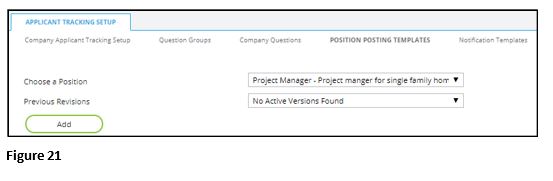
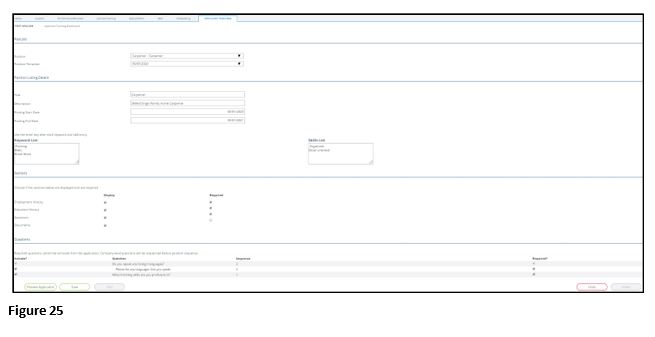
Everything you have already done in all the prior steps, all leads up to posting a position, which is within the fourth subtab, Position Posting Templates. When you choose to set up a position posting template, you’re first choosing the position you’d like to post and then you’re filling in the template of everything the applicant is going to see about the position and is required to do to apply for the position. Templates can be added multiple times for the same position because the template and process that you want specific applicants to go through when applying for a specific position may change over time. Next to Choose a Position, click on the dropdown box and select the position that you will be posting (Figure 21). What the Previous Revision option allows you to do is select this template (set by date) so you do not have to recreate the entire position template again, in the future. When you set up a position for the first time, you do not have the option to choose a Previous Revision, because you have never established a position posting template before. Once completed, click on Add.
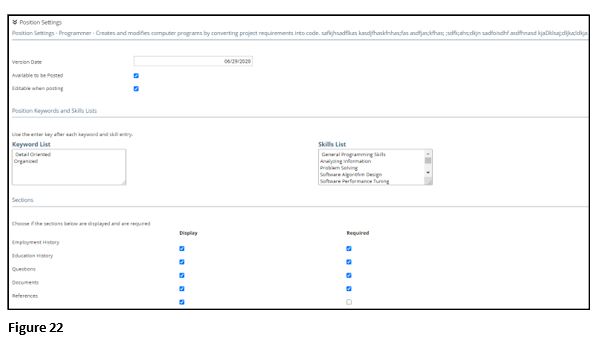
Within this fourth subtab, there are 2 different sections. To open or close any of the sections, click on the arrows to the left of the section name. Under the Position Settings section, the Version Date will always reflect as today’s date, but it can be changed, if needed (Figure 22). If you want this positon to be posted right away and this template to be used, click on the box next to Available to be Posted. This means you can go to the Post New Job page and can post this position with this particular template. Since this is just a template, you can have the option to alter what’s in this template when you actually post the position. If this is the case, check the box next to Editable when posting. If, for example, you have company standards for a posted position that will be applied to all applicants, and you don’t want anyone to alter the template when it’s posted, do not click this box. You can set position keywords and skills by listing them in the Keyword List and Skills List boxes. Currently, these boxes are here for future development, because as of now the software is just loading files for information and it is not able to scrub resumes and cover letters to catch these keywords and skills to make sure applicants are applying for positions they’re qualified for. The Sections which are shown to an applicant can have the options to be displayed to the applicant and/or required for the applicant to complete. These sections include Employment History, Education History, Questions, Documents (IE: uploading a resume) and References. Click the boxes next to any of the sections which apply to this position; and click the boxes below Required if any of these sections are required to be answered by the applicant.
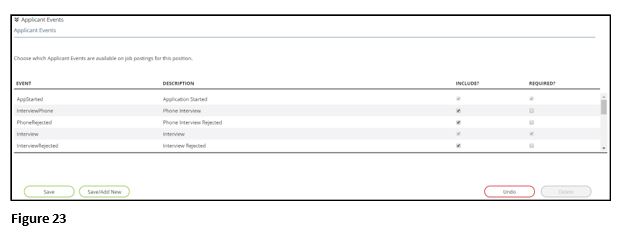
Under the Application Events section, this lists all of the events that an applicant can go through (Figure 23). Not all of these processes/events will apply to this particular position (IE: a Project Manager may need to go through two interviews, whereas a Receptionist may only need to do one phone interview), so select or unselect any boxes below Include? and if it is an event that will be required, select the box below Required?. Once completed, click on Save. Please note that once templates have been made, the selected template choices cannot be changed. Once you are on the Post New Job page though, you will be able to make changes to these choices, which are specific to the position you are posting, except to the Applicant Events section.
Notification Templates
The fifth subtab, Notification Templates, has templates for all of the different types of notifications you might send out to an applicant during the AT process and it allows for quickly generating emails to them (Figure 24). When you are on an applicant in the AT Dashboard, you have the opportunity to send them messages regarding their step(s) within the application process. To begin, click on Add. You will then add a Name, which will be a very good description of what this notification will be used for. Then click on the dropdown box next to Notification Type, where you will select from the following options, which is considered the main type of notification you are setting up – Interview Request, Job Offers, Message, Onboarding and Rejection. In the Subject box, you will enter the outgoing subject of the email that will be sent. In the Email From box, enter the email address for whomever or whatever department will be sending the email. Within the Body, you will enter what the message will say to the applicant. Once completed, click on Save. Automatically insert the applicant’s name, the job title, your company’s name, the interviewer’s name, the interview date, the interview times and the interview location with the following variables: {APPLICANT_NAME}, {JOB_TITLE}, {COMPANY_NAME}, {INTERVIEWER_NAME}, {INTERVIEW_DATE}, {INTERVIEW_TIME_BEGIN}, {INTERVIEW_TIME_END}, {INTERVIEW_LOCATION}. These can be used within the Subject box and also within the Body of the message.

Posting a Job
To post a new position, click on the Company tab and then click on the hyperlinked Applicant Tracking selection under the Human Resources Setup box. Within this AT screen, click on the Post New Job subtab. Within this AT screen, you can also click on the Applicant Tracking Dashboard subtab, and then select Add Job on the left side of the screen. To begin, click on Add. Then select the Position that you would like to post in the dropdown box (Figure 25). You will then select the Position Template in the next dropdown box. They will always be listed by the version date that was given when setting up the position. You must always have a template in order to post a position, as not selecting a template does not provide any information to change/update. If the position is editable, you may make any necessary changes to the template, before posting it. Add the position’s Title and a brief Description, which will appear at the top of the post. Select the dates you want this position to be active for applicants to apply for it, by selecting the dates next to Posting Start Date and Posting End Date. If not already populated, list any applicable words within the Keyword List and Skills List sections. Select any of the Sections which are to be displayed and/or required to answer/fill out by the applicant (Employment History, Education History, Questions, Documents and References). Select or unselect any Questions which pertain to this specific position. Once completed, click on Save.
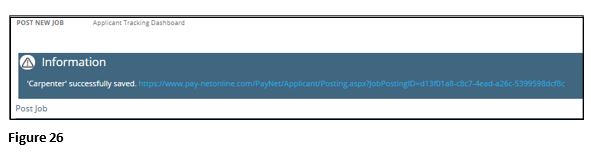
Once you click Save, you will be given a confirmation on the top of the page, which will include the URL for the position you posted (Figure 26). This URL will be tied into any job boards which you previously set up for your company. If they apply for the position through the link on a separate job board, they will be automatically sent to your company’s AT module to complete the application process. In order to access this link in the future, you will click on Jobs within the AT Dashboard (further instructions listed in the next section).
Applicant Tracking Dashboard
To access the Applicant Tracking Dashboard, click on the Company tab and then click on the hyperlinked Applicant Tracking selection under the Human Resources Setup box. Within this AT screen, click on the Applicant Tracking Dashboard subtab. You can also access the AT Dashboard by clicking on Dashboards on the Home page, then clicking on the Applicant Tracking Dashboard subtab.
Jobs Section
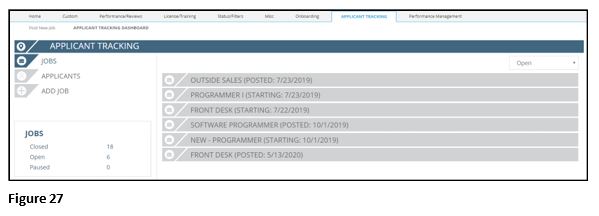
When the Dashboard opens, it will be on the JOBS section (reflected on the left side of the screen). You will be shown all of the positions which have been posted for your company (Figure 27). The position name is highlighted in grey and clicking on the name will open up a section with more information about the position. In order to filter positions and view any closed positions (as Open positions are the default positions that reflect on the Dashboard), click on the dropdown button located in the top right section of the screen, and select Closed.
Position Details
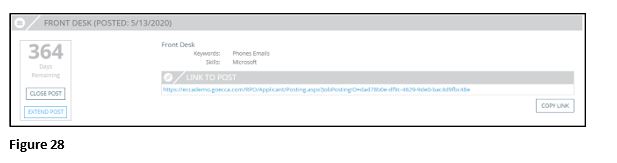
When clicking on any highlighted position name, the information that opens up is broken down into different sections (Figure 28). The Position Details section includes the name of the position, the date it was posted, how many days are remaining before the position will close, a button to close the position, a button to extend the position, a link to the posted position and a button to copy the position’s link. In order to permanently close a position (IE: You hire an applicant before the position has closed), you will need to click on the Close Post button, located below how many days are remaining for the position. Once a position has been closed, it cannot be reopened; a new position will need to be posted with the same information, if it was accidentally closed. Once a position is closed, if an applicant tries to click on the link from any job boards it was previously listed on, it will reflect that the position is no longer accepting applicants.
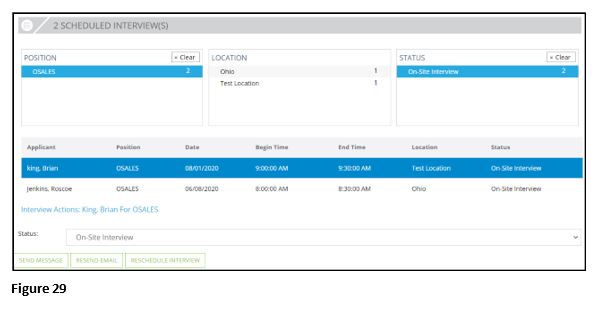
Scheduled Interview(s)
The Scheduled Interview(s) section includes the position’s code/name, the location of the interview and the status of the interview (Figure 29). Clicking on any of the position codes/names, locations and/or statuses, this will automatically filter the applicants. Unselecting any of the blue highlighted position codes/names, locations and/or statuses, or clicking on the ‘x Clear’ button in the top right corner of each box, will unselect these particular position codes/names, locations and/or statuses (IE: in the screenshot below, this reflects the filter selections for all of the applicants who applied for the OSALES position, are at both the Ohio and Test Location locations and are within the On-Site Interview statuses; where there are only 2 applicants for these filter selections and their names reflect in the below screenshot). Below this information reflects the applicant’s name and all of the information about the interview. Clicking on the applicant’s name will bring up Interview Actions for this particular applicant. By selecting the dropdown box next to Status, you can change the applicant’s interview status from On-Site Interview (default status) to Phone Interview. The default Reschedule Interview box will pop up, where options can be selected to send an updated email to the applicant or a note can be added about the applicant (further instructions given below, under the Applicant Actions section, regarding these actions). If an applicant needs to have another email sent to them or the interview rescheduled, selecting any of the green boxes (Send Message, Resend Email or Reschedule Interview), will allow you to send the appropriate email.
Job Offer(s)
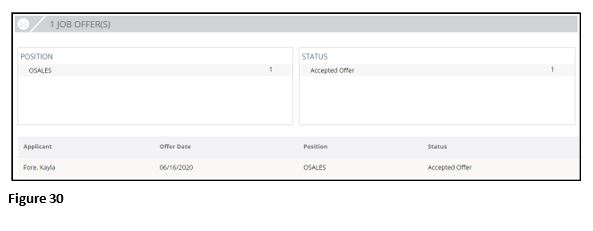
The Job Offer(s) section includes the position’s code/name within the box on the left; and the status of the offer within the box on the right (Figure 30). Clicking on any of the position codes/names and/or statuses, this will automatically filter the applicants. Unselecting any of the blue highlighted position codes/names and/or statuses or clicking on the ‘x Clear’ button in the top right corner of each box, will unselect these particular position codes/names and/or statuses. Below this information reflects the applicant’s name, the date they were sent the offer, the position’s code/name and the status of the offer.
Application(s)
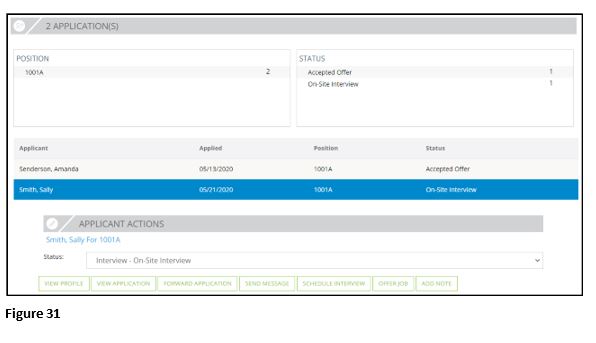
The Application(s) section includes the position’s code/name within the box on the left; and within the box on the right, this includes the different statuses the position has and next to the status includes the number of applicants who are within each status (Figure 31). Clicking on any of the position codes/names and/or statuses within each of the boxes, this will automatically filter the applicants. Unselecting any of the blue highlighted position codes/names and/or statuses or clicking on the ‘x Clear’ button in the top right corner of each box, will unselect these particular position codes/names and/or statuses. Clicking on any applicant’s name will bring up Applicant Actions for this particular applicant (further instructions given below, under the Applicants Section).
Applicants Section
When clicking on the APPLICANTS section (reflected on the left side of the screen), you will be able to filter through information provided about your company, based on the applicants, the positions and the statuses.
All Applicants
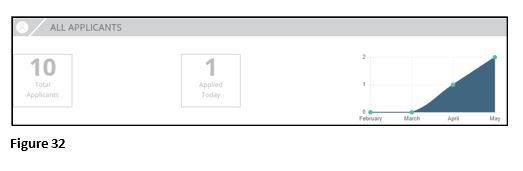
The All Applicants section will give you a brief overview of all applicants. It gives you a number of how many applicants your company has, how many have applied today and a graph that reflects how many applicants have applied for positions within your company during the current month and three months prior (Figure 32).
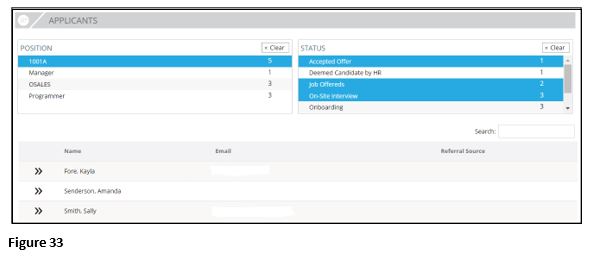
Applicants
Within the Applicants section, there are two boxes, Position and Status, where the contents of each box can be selected and unselected to filter which applicants are listed below (Figure 33). The Position box lists all of the positions your company has open, and the number next to each position is the amount of applicants who have applied for it. The Status box lists all of the possible statuses that an applicant can be at during the process, and the number next to each status is the amount of applicants who are within this particular status. Clicking on any of the positions and/or statuses, this will automatically filter the applicants. Unselecting any of the blue highlighted positions and/or statuses, or clicking on the ‘x Clear’ button in the top right corner of each box, will unselect these particular positions and/or statuses (IE: in the screenshot below, this reflects the filter selections for all of the applicants who applied for the 1001A position and are within the Accepted Offer, Job Offered or On-Site Interview statuses; where there are only 3 applicants for these filter selections and their names reflect in the below screenshot). Currently, the filter selections only filter applicants by the first position that they’ve applied for, not by all of the positions they’ve applied for (IE: if an applicant applied for a Programmer position on 5/1/20 and then for a Sales position on 5/13/20, their name will only reflect on the filter information for the Programmer position, not the Sales position). In order to see all positions a specific applicant has applied for, click on the downward arrow to the left of the applicant’s name. Once this is rectified, you will be notified by your service bureau.
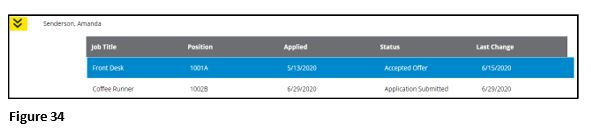
Next to each applicant’s name, there are arrows (highlighted in yellow, below) that can be clicked on, in order to open up more information about the applicant (Figure 34). When this icon has been selected, brief information will reflect regarding the applicant, to include the Job Title(s) they’ve applied for, the Position(s) (as job titles and positions can sometimes have different names), the date(s) they Applied, the position’s Status(es) and the Last Change(s) made to the position(s).
Applicant Actions
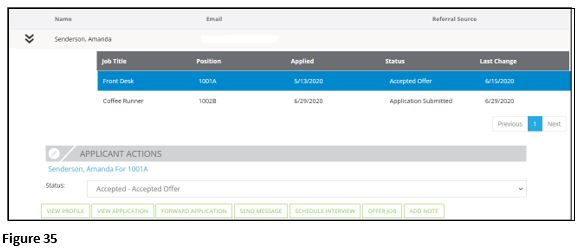
Clicking on any of the applicants’ names will bring up Applicant Actions for this particular applicant, where different actions can be taken (Figure 35). This is where you can review prospective new hires’ profiles and applications, you can forward their application to others via email, you can make notes within their profile and this is where all status changes and notifications are sent to prospective new hires, including interview requests and job offers. To change the status of the applicant, click on the dropdown box next to Status and select the correct status of the applicant. Applicants do not have to go through every single step/event that was originally setup and they can go in any order, so it is fine to select any status which applies to them. Statuses are also not tied to notifications, so you can change an applicant’s status without notifying them of the change. When selecting a status, a window will pop up, which is an automatic message template that can be sent to the applicant regarding their current status (further instructions listed below). To view the applicant’s profile, click on View Profile. Within this screen, you can Print and/or add a Note on the applicant’s profile. To view an applicant’s application for a specific position, click on View Application. Within this screen, you can Print, add a Note and/or Forward this application via email to another person (a similar screen will pop up when you click on Forward Application).
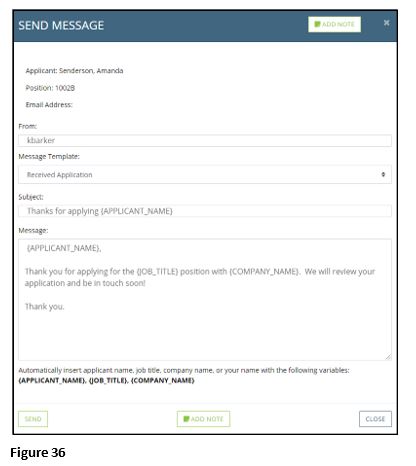
Depending on which Status you select, a certain window will pop up, which is an automatic message template that can be sent to the applicant regarding their current status. If you select a more general status, which does not pertain to an interview, a job offer, onboarding or rejecting an applicant, you will get a Send Message pop up window (Figure 36) (This same action can be done by clicking on Send Message, under Applicant Actions (Figure 1.AJ)). Within this pop up window, you may select a pre-made message template and can revise the message to reflect whatever’s necessary for the particular applicant. Once completed, click on Send and an email will be sent to the applicant. If you just want to change the applicant’s status in the system, but do not want to send them an email, click on Close. Their status will be updated on the AT Dashboard, but no email will be sent to them.
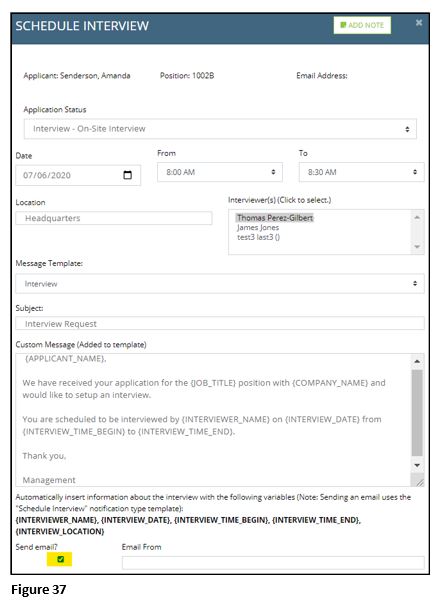
If you select a status which pertains to any kind of interview, you will get a Schedule Interview pop up window (Figure 37) (This same action can be done by clicking on Schedule Interview, under Applicant Actions (Figure 1.AJ)). Within this pop up window, you can compose an email to an applicant, requesting them to come to an interview. Select the appropriate Application Status, schedule the Date, Time and Location, select the appropriate Interviewer(s), select the appropriate Message Template and make any necessary changes to the email Subject and/or Custom Message. In order to make sure the email gets sent, click on the box below ‘Send email?’ (highlighted in yellow, below). Once completed, click on Schedule and an email will be sent to the applicant. If you just want to change the applicant’s status in the system, but do not want to send them an email, click on Close. Their status will be updated on the AT Dashboard, but no email will be sent to them.
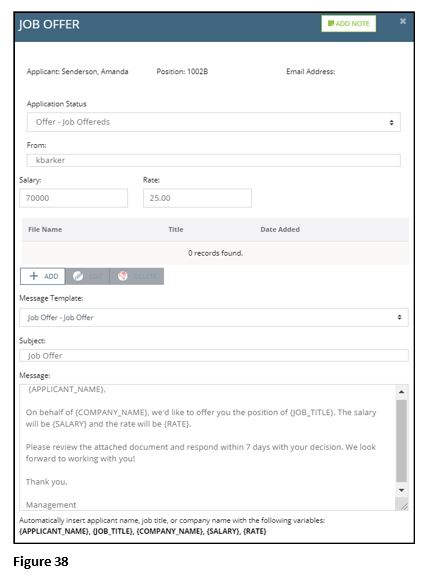
If you select a status which pertains to a job offer, you will get a Job Offer pop up window (Figure 38) (This same action can be done by clicking on Offer Job, under Applicant Actions (Figure 1.AJ)). Within this pop up window, you can compose an email to send to an applicant whom you’d like to offer a position to. You can select the appropriate Application Status, list who the email is From, list the Salary and Rate, attach a Document/File (IE: offer letter), select the appropriate Message Template and make any necessary changes to the email Subject and/or Message. Once completed, click on Send and an email will be sent to the applicant. If you just want to change the applicant’s status in the system, but do not want to send them an email, click on Close. Their status will be updated on the AT Dashboard, but no email will be sent to them.
If you select the Onboarding status, you will get a Prep Onboarding pop up window (Figure 39). Within this pop up window, you can quickly move an applicant, who accepted a job offer, to your company’s onboarding step. Make sure the correct Application Status is selected and select the appropriate Onboarding Setup Group. Once completed, click on Select. You will be automatically redirected to your company’s Onboarding screen for this particular applicant, where you can continue the process of making them a newly on-boarded employee (further instructions are provided in the Onboarding Instructions manual). Any Notes made about this applicant (further instructions listed below) will also reflect on this Prep Onboarding pop up window.

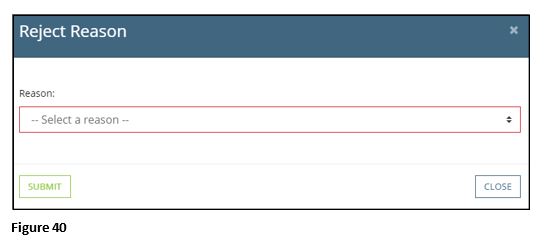
If you select any of the Reject statuses, you will get a Reject Reason pop up window (Figure 40). Within this pop up window, select the appropriate Reason in the dropdown list and then click on Submit. Currently, there is a bug that still needs to be rectified. 1) Once Submit has been selected, the applicant’s status does not change and the applicant doesn’t receive an email letting them know they’ve been rejected from this position. Once this is rectified, you will be notified by your service bureau.
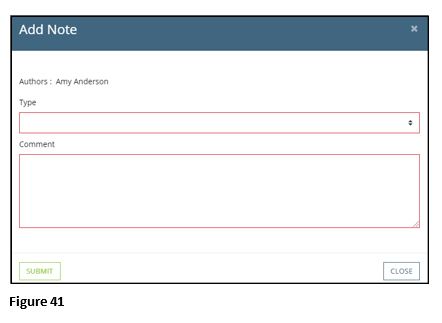
To add notes to an applicant’s profile, click on Add Note (Figure 41) (This same action can be done by clicking on View Profile, View Application, Send Message, Schedule Interview or Offer Job, under Applicant Actions, and then selecting Add Note (Figure 41). Within this pop up window, you will select what Type of note you’d like to add to the applicant’s profile by clicking on the dropdown box. The different types of notes include: Application Note, Interview Note, Job Offer, Other and Testing Note. Enter the note in the Comment box and click on Submit when done. In order to see all of the notes that have been made about an applicant, click on View Profile. Application Note notes will also reflect when one clicks on View Application. Interview Note notes will also reflect when one clicks on Schedule Interview. Job Offer notes will also reflect when one clicks on Offer Job. When one clicks on Forward Applications, all notes will be included in the email the recipient receives with the applicant’s application.
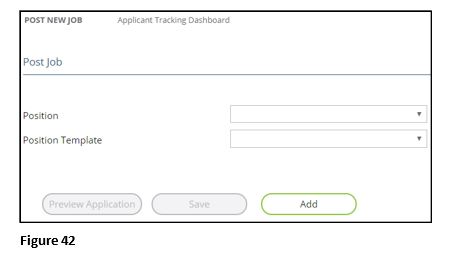
Add Job Section
By clicking on the ADD JOB section (reflected on the left side of the screen), you will be taken back to the Post New Job screen, where you will be able to post a new position (Figure 42).
Applicant Tasks for Applicant Tracking
Applying for a Job Overview
After clicking on a position’s URL or link, applicants will be forwarded to your company’s AT module. Within this module, applicants will be able to review the posted position, apply for the position and/or save the posted position. Any of these steps can be done during this process and once completed, their information will be sent to your company’s AT dashboard, where you will then be able to further review the applicant.
Applicant Tasks-Walkthrough
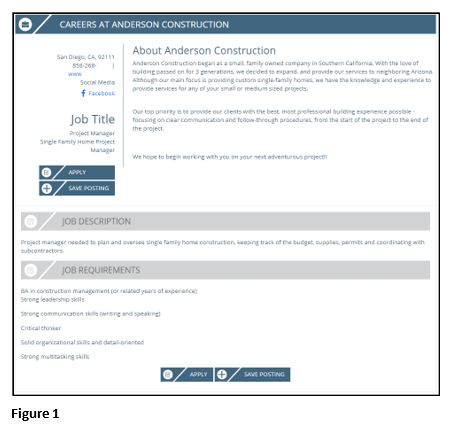
1. When clicking on a link regarding a position with your company, the applicant will be sent to a page where they are provided with information about your company, and another recap about the position they are applying for – title, description and requirements (Figure 1). To apply for the position, they will click on the Apply button. To save the position (IE: apply at a later date), they will click on Save Posting.
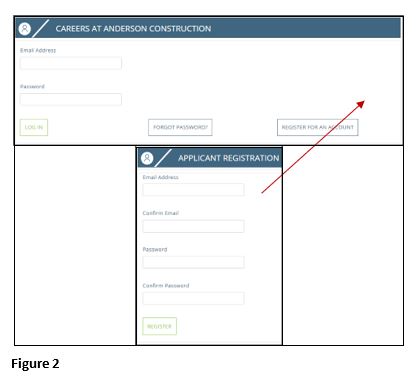
2. Once an applicant clicks on either Apply or Save Posting, they will be sent to a screen where they will need to register for an account (Figure 2). If they have already applied for a position with your company, they will enter their email address, password and click on Log In. If they have never applied for a position with your company, they will need to click on Register For An Account. They will need to enter their email address twice and make a password, which they will also enter twice, and click on Register.
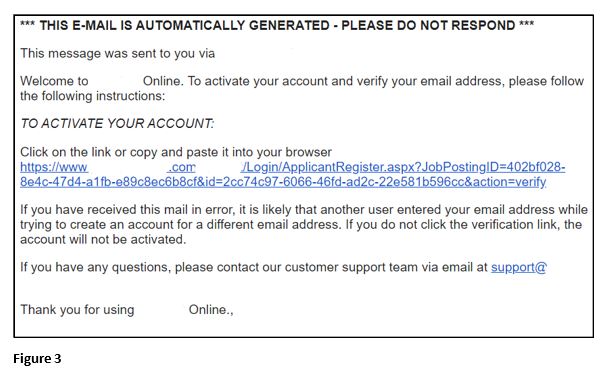
3. Once the applicant clicks on Register, they will be sent an automatic email. Before proceeding, they will need to click on the link within this email to confirm their account setup (Figure 3).
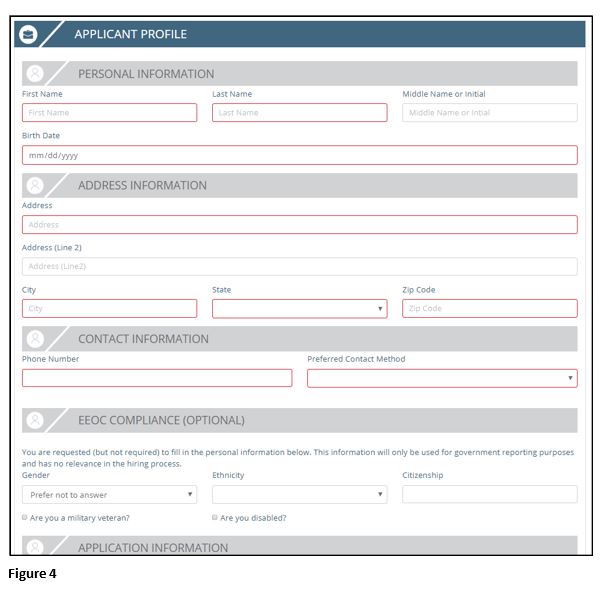
4. Upon logging into their account for the first time, applicants will need to complete their Applicant Profile (Figure 4). This includes their personal information, address information, contact information, EEOC compliance information (optional) and application information. Everything with a red box around it is required to be completed before moving on to the next step; everything else can be completed in subsequent sessions, if necessary. At the bottom of this page, they can click on Employment And Education History, entering as much employment and/or education information as they’d like (further instructions are listed below, in the second paragraph of Step 5). Once they have completed their Applicant Profile, they will click on Save. Any of this profile information can be updated/changed at any time by the applicant, by them clicking on My Profile in the top right corner of the screen.
5. The next section the applicant will be presented with will be all of the company and position-related questions (Figure 5). They will be able to copy and paste their resume, upload any documents (IE: resume, cover letter), add references, add their employment and education history, answer any additional questions specific to the position and add application referral information. Currently, the system isn’t able to scrub uploaded resumes and automatically populate employment and education experience, so this information will need to be manually added by the applicant.
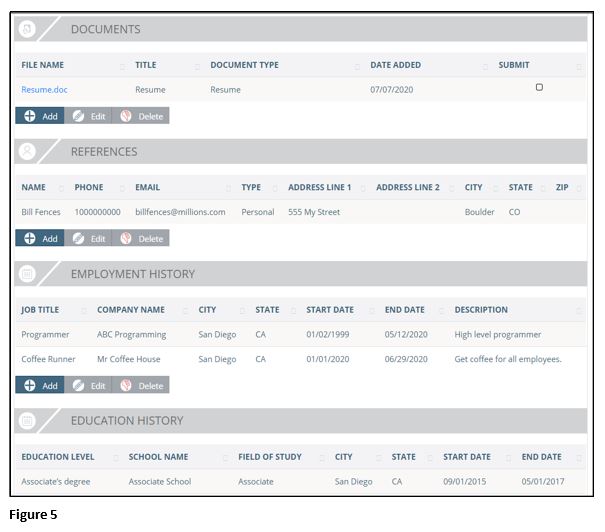
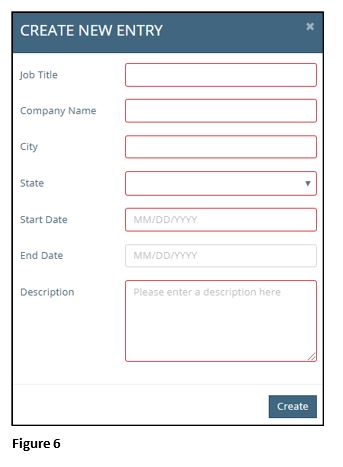
In order to add a document, add a reference, add employment history or add education history, they will click on the Add button below each of these sections. Everything with a red box around it is required to be listed (Figure 6). Once everything has been uploaded and/or entered, they will click on Create. If a document or entry needs to be either edited or deleted after it has been added, they can highlight the document or entry and click on either Edit or Delete.
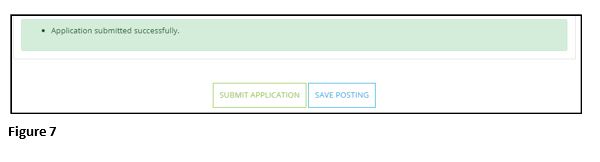
6. Upon completion of all of these required steps, they can either save the position or apply for the position (Figure 7). If they save it, they will be able to access the position at a later date and apply at this time. Not everything they have already filled out/selected will re-populate and they will have to fill out/select some sections again. This is done by clicking on Save Posting. If they click on Submit Application, the application will be submitted to your company’s AT dashboard.
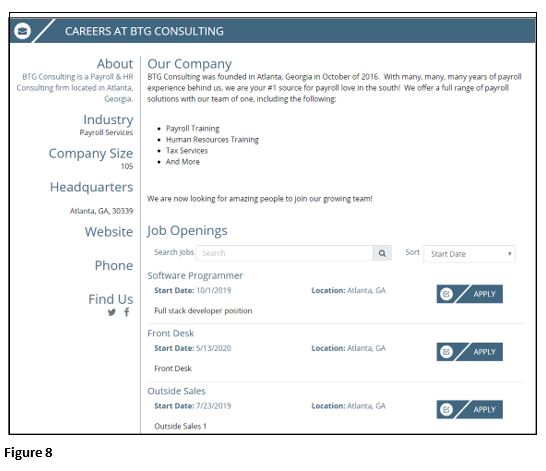
After submitting their application, and the screen reflects that it’s been successfully submitted, they will shortly thereafter be automatically sent to a page which reflects information about your company, to include further details about your company and all of your company’s positions that are currently open (Figure 8). They will be able to search for positions next to Search Jobs; they can sort the current open positions by selecting one of the options in the dropdown box next to Sort; and they can easily apply to any of the open positions by clicking on Apply, next to the position.
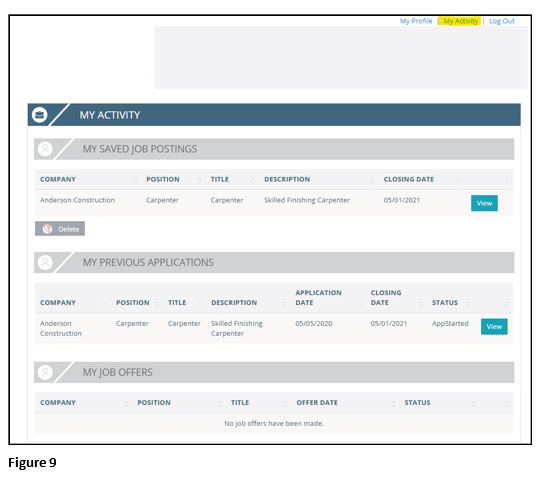
Within the applicant’s account, in the upper right hand corner, there is a link to go to their My Activity page (Figure 9). On this page, applicants can see all of the positions they have saved, all of the positions they have applied for and any job offers they have received, pertaining to your company. It is on this page where applicants can go and complete the application process they had previously started and saved for a specific position. This is done by clicking on View next to the position listed under My Saved Job Postings (if they click on View next to a position they have already applied for in this section, they will only be able to view part of the information included within their submitted application for this position). If they’d like to delete a saved position, they can highlight the position and click on Delete. If they click on View next to a position listed under My Previous Applications, this will bring up all of the information included within their submitted application for this particular position.